
Easy Origami Corner Bookmark + 3 Free Botanical Papers

An origami corner bookmark is a small folded paper pocket that slips over the corner of a page. This version begins with one square, uses no glue, and leaves a little triangle of botanical paper visible when you open your book.
Follow the six steps below with plain paper, or print one of the three original SnipMeadow patterns: sage sprigs, blush meadow and fine leaf lines. The free five-page pack includes a folding reference and a separate sheet for each pattern, in both A4 and US Letter.
Jump to the free botanical papers, or start with the paper guide if this is your first folded bookmark. You only need scissors to cut your starting square; the bookmark itself is held together by folds.
Table of Contents
Paper and size for your origami corner bookmark
Start with a 15 x 15 cm square, approximately 5.9 inches on each side. That size gives your fingers room to tuck the flaps. The printable squares are exactly 15 cm at 100% scale. If you already have 6-inch origami paper, use it as it is; the tiny difference will not change the folding sequence.
Use ordinary printer paper or lightweight origami paper. For the downloadable patterns, standard 80 gsm printer paper is a practical starting point. Thick cardstock stacks up at the tucked corners and makes the pocket harder to close. Smooth paper is easier to handle than paper with glitter, heavy texture or a plastic coating.
- One true square of paper, plain or patterned.
- A ruler, pencil and scissors if your paper needs trimming.
- A flat surface and a clean fingertip for pressing the creases.
- Optional: a fine pen for a small doodle after folding.
The finished square is approximately half the starting square’s side length. Measure along its straight edges, not from point to point when it is sitting like a diamond. These dimensions describe the folded shape; the usable pocket is slightly smaller because of the paper layers.
| Starting square | Approximate finished square | When to try it |
|---|---|---|
| 15 x 15 cm | 7.5 x 7.5 cm | First attempt; the size included in the PDF |
| 12 x 12 cm | 6 x 6 cm | A smaller bookmark after learning the folds |
| 10 x 10 cm | 5 x 5 cm | A compact version for a small book |
If your sheet is rectangular, measure a square with a ruler and cut along the two marked edges. Check that all four sides match. A slightly uneven square can still fold, but the difference becomes more noticeable when both tips are brought together.
How to make an origami corner bookmark in 6 steps
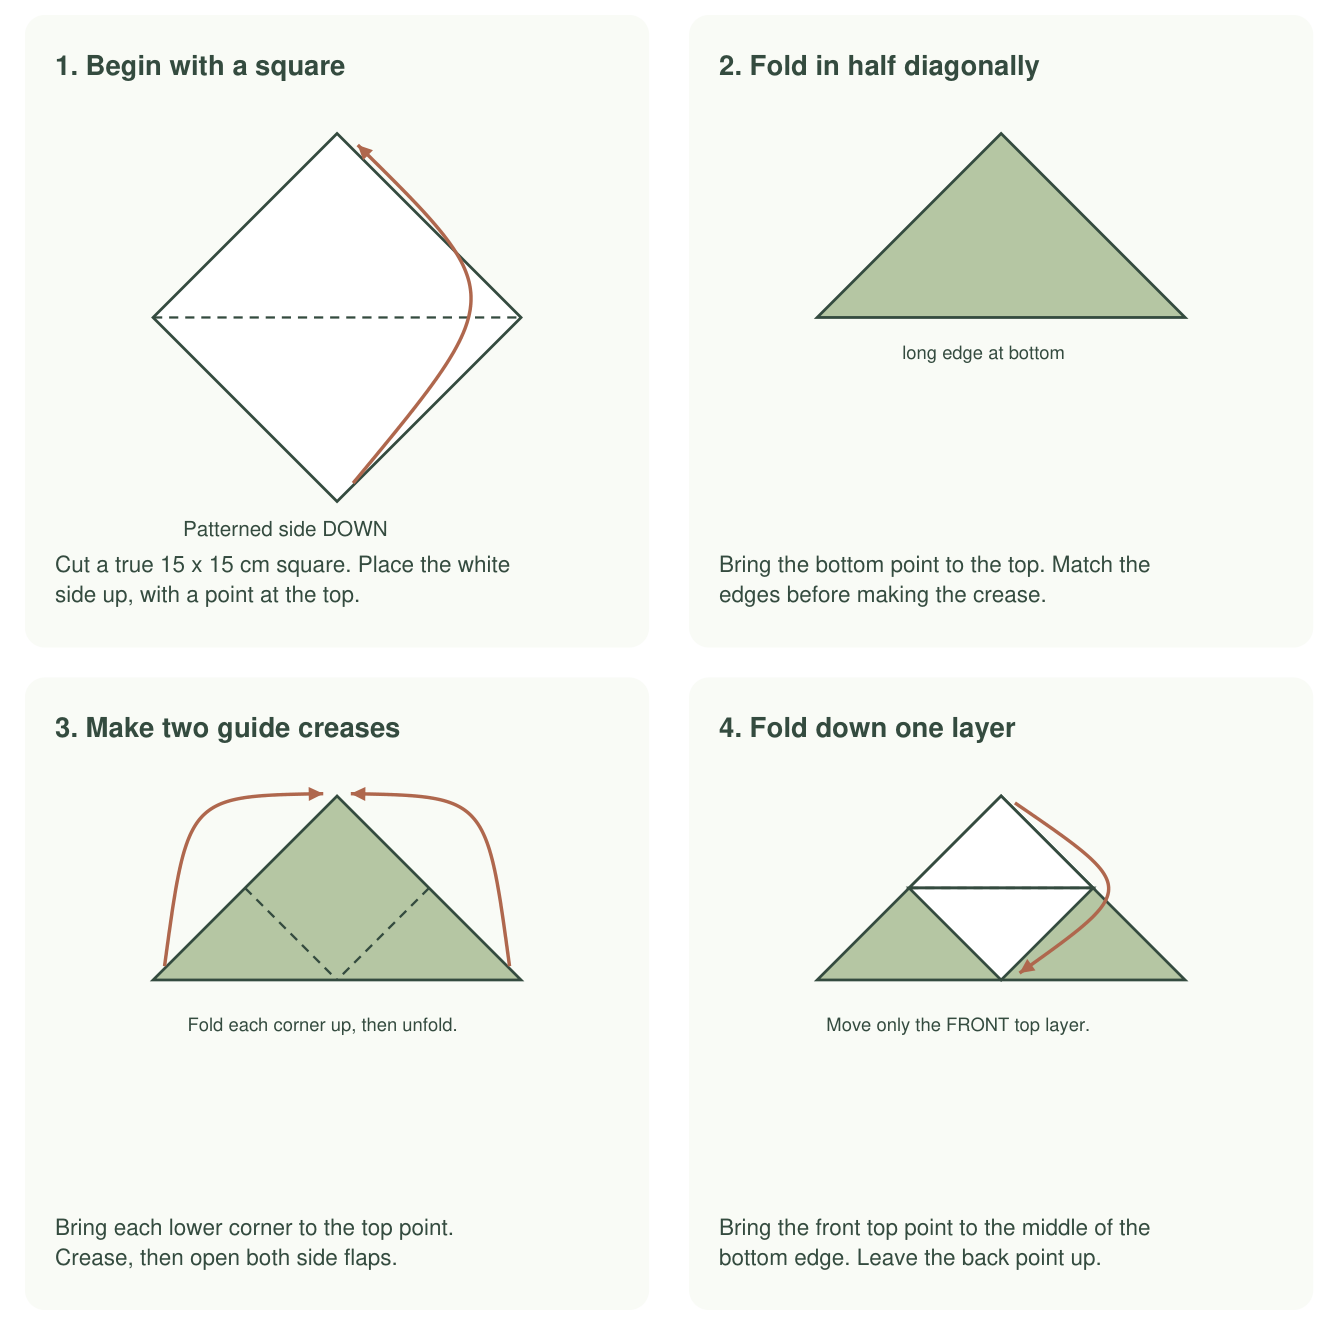
The diagrams use green for the patterned side and white for the reverse. Orange arrows show movement, while dashed lines mark folds. Keep the long edge of the triangle at the bottom until the pocket is finished.
1. Place the square patterned side down
Set the paper on your table with the white side facing you. Turn it so that one corner points up, one down and one to each side. If you are using plain paper, either face can be the front.
2. Bring the bottom corner to the top
Lift the bottom point to meet the top point. Align the sloping edges before pressing the long bottom crease. You now have a triangle with two layers and the patterned side facing up.
3. Fold both side corners up, then unfold
Take the lower-left corner to the top point and press its fold. Do the same with the lower-right corner. Open both flaps again, returning to the wide triangle. The two guide creases meet at the middle of the bottom edge.
4. Fold down only the front top layer
Separate the two points at the top. Bring only the point nearest you down to the middle of the bottom edge and crease. Leave the back point standing. The turned-down triangle creates the layer beneath which the side tips will tuck.
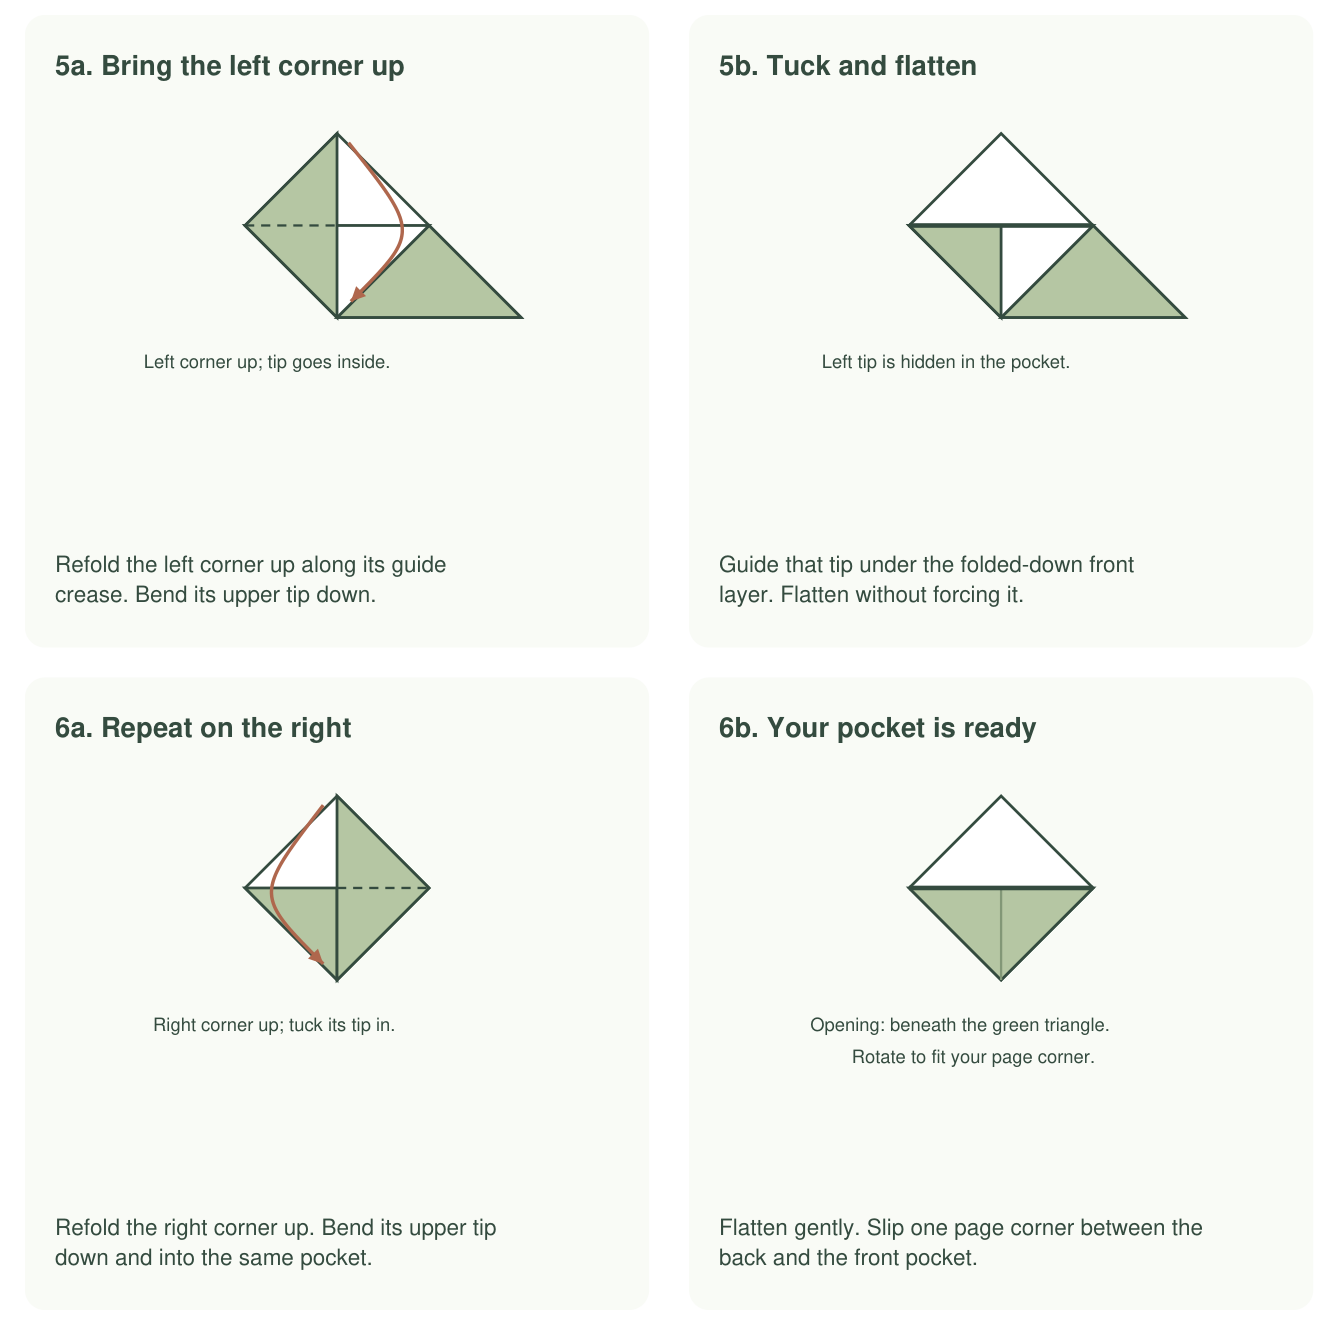
5. Tuck the left corner into the pocket
Refold the left corner toward the top along its guide crease. Bend its upper tip down and guide it under the front layer made in step 4. Flatten gently. In the diagram, 5a shows the raised flap and 5b shows the same flap after its tip has disappeared inside.
6. Repeat on the right and fit the bookmark
Bring the right corner up and tuck its upper tip into the same pocket. Smooth the two sides. Rotate the finished diamond to suit your book, then slide one page corner between the back and the patterned front triangle. The page goes into the broad opening beneath that triangle.
Open and close the book gently once to check the fit. The bookmark should sit flat without needing to stretch over a stack of pages. For a reading-journal set, pair your folded bookmark with the free reading journal printable.
Watch the basic folding motion
If the tucked corners are easier to understand in motion, watch this basic corner-bookmark demonstration by Red Ted Art (Maggy Woodley). Keep your practice square beside you and pause when the front layer folds down. Use our botanical papers with the same pocket fold.
Watch the tutorial directly on YouTube if the player does not appear.
Simple fixes for an origami corner bookmark
The pocket will not open
Go back to step 4 and check the top point. Folding both layers down removes the tall back layer you need. Lift the back point up again, keeping only the front point folded down. Also check that you are opening the broad pocket, rather than trying to separate the small tucked tips.
One flap keeps sticking out
Lift that side gently and guide its tip beneath the front layer instead of leaving it resting on top. Avoid adding glue to solve this: glue can close the opening intended for the page. If the paper has become crumpled after several attempts, restart with a fresh practice square.
The two sides look uneven
Check the starting square first. Next, compare the guide creases: both lower corners should have touched the same top point in step 3. Press folds after lining up the tips, rather than trying to drag an already sharp crease into a new position.
The bookmark feels too bulky
Try thinner paper and keep decoration flat. A stack of stickers, foam shapes or ribbon knots can make the book uncomfortable to close. For an origami corner bookmark that takes up less room on the page, try a 12 cm square after practising with the 15 cm size.
The bookmark slips off easily
Check that the page corner has entered the pocket fully, without being forced. Smooth loose creases and try a smaller square if the bookmark looks oversized. A corner bookmark is a removable page marker, so it can still move when an open book is handled or turned upside down.
3 botanical paper ideas for your bookmark
Small, repeating motifs work well because only part of the printed square remains visible. A large flower placed in the middle of the sheet may disappear into a fold. The included designs spread their details across the paper, so you do not need to position one focal image precisely.
Sage sprigs
Use the soft green leaf pattern for an everyday bookmark. Pair it with an ivory journal page or a simple pencil reading log. Leave the pocket plain: the repeated leaves already give this small paper craft enough detail.
Blush meadow
The second pattern adds tiny blush flowers to the green stems. Try it for a book-club gift tucked inside a handwritten note. Keep the note separate from the pocket so that the bookmark can slide onto a page immediately.
Fine leaf lines
The third design uses outlined leaves on white, with no cream background fill. Choose it if you prefer a lighter printed page. You can also practise on plain white paper and draw one small leaf on the finished front triangle.
For more DIY bookmarks with a personal detail, add an initial or a tiny open-book drawing. Our book doodle ideas give you a few simple motifs to try on scrap paper first. Let any ink dry before placing decorated paper against book pages.
Download the free origami corner bookmark papers
Choose the PDF that matches the paper loaded in your printer. Both versions contain the same five pages and the same 15 cm squares. You do not need to print both formats.
- Folding reference: steps 1-4.
- Folding reference: steps 5-6, with the tucks shown separately.
- Sage sprigs printable square.
- Blush meadow printable square.
- Fine leaf lines printable square.
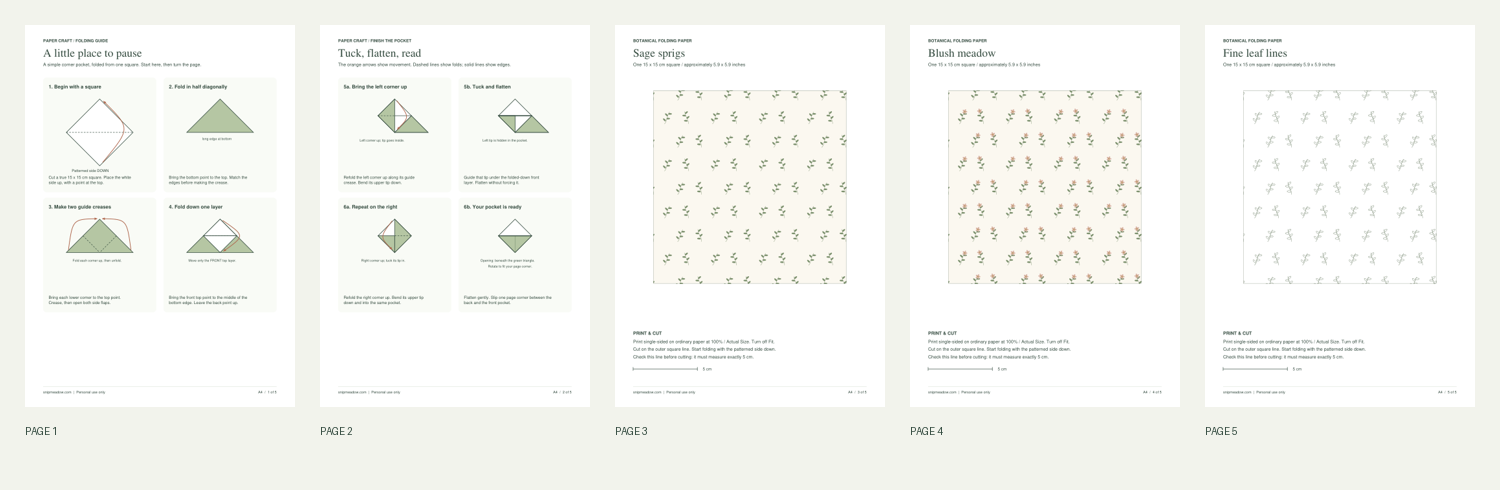
Print single-sided at 100% or Actual Size, with Fit and Shrink turned off. Each pattern sheet has a 5 cm check line. Measure it before cutting, then trim the square on its outer border. The guide pages can stay on your screen if you only want to print the patterned paper.
The PDF dimensions and page layouts have been checked digitally; physical printing and folding have not been tested. The main image is a styled botanical example, while the preview above shows the exact included patterns. Try one plain-paper fold before printing several copies.
These original SnipMeadow papers and drawings are for personal use. Please share the article link so friends can download their own copies. The pocket is a familiar folding method, not a new model invented for this article.
Questions about paper corner bookmarks
Does an origami corner bookmark need glue?
No. The tucked flaps hold this pocket together. Scissors are only needed to cut a square from a larger sheet. If you start with square origami paper, the entire bookmark can be made by folding.
Can I use paper printed on both sides?
Yes. Choose the face you want on the front triangle and start with that face down. The other face will appear on the backing. For the first attempt, contrasting sides make it easier to see which layer you are moving.
Can I fold a whole A4 or Letter sheet?
This sequence starts with a square. Cut a square from the rectangular sheet first; do not follow the steps with the rectangle unchanged. The included PDFs make this easy by providing a clearly bordered 15 cm square.
Is this a good first origami project?
It is a small project with repeated folds, but tucking the tips can take a little practice. Work with a larger square first and keep the reference open beside you. For another explanation of the basic pocket, see Mombrite’s corner bookmark tutorial.
If you would like a seasonal page marker without folding, explore our free printable Christmas bookmarks. For more paper craft ideas and small journaling projects, join Creative Notes through the signup form on SnipMeadow.


Looking for another little project? Explore Journaling, Printables or Paper Crafts.