
Origami Flower: Make a Beautiful Tulip in 7 Steps
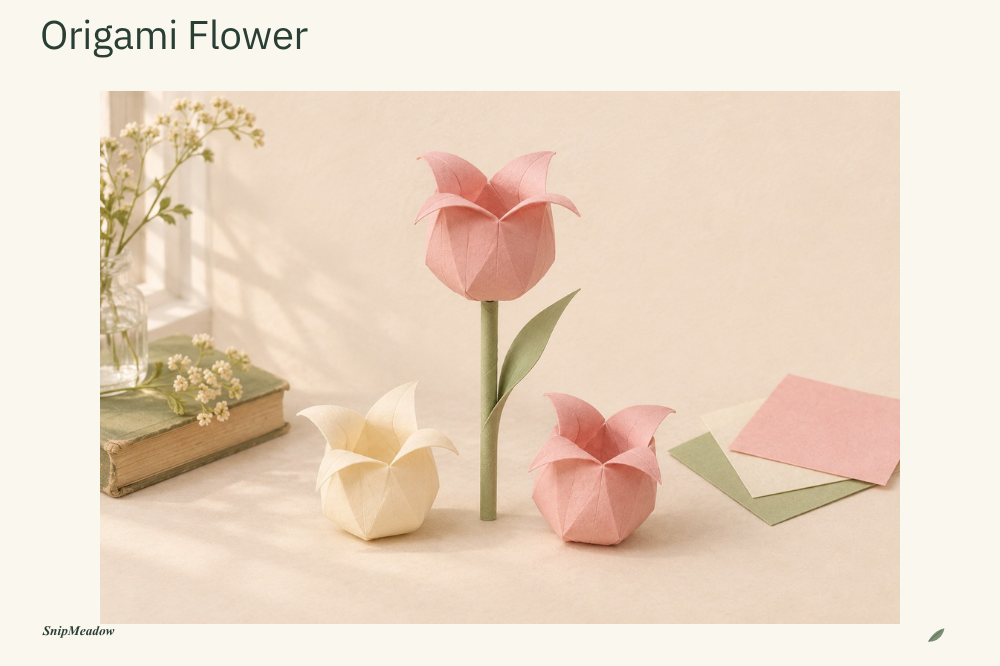
Make an origami flower from one square of paper, then give it a place on a gift box, a small display or a removable journal wrap. This tulip opens into a rounded bloom with four folded petals. The flower head needs no cutting or glue once your paper is square.
Start with a single practice flower. A quiet blush or ivory paper makes the folds easy to see, while a sage accent can connect the finished bloom to your other paper projects. You can add a stem later; the first goal is a flower that opens without tearing.
This guide groups the traditional tulip into seven stages, with advice on paper, finishing and using the result. The model has depth, so plan a little space around it rather than pressing it between journal pages.
Jump to the seven folding stages Get the free PDF guide
Table of Contents
Choose paper for your origami flower
For your first attempt, use a square of thin origami paper about 6 inches or 15 cm across. Those are convenient starting sizes, not exact equivalents. Paper with a colored face and a white reverse helps you recognize which side should be showing as you work.
Keep the pattern small or use a plain color. Large flowers printed on the sheet can disappear into the folds, and a dark, busy pattern makes the edges harder to follow. Save a favorite decorative paper until you have made the shape once.
| Paper you have | How to use it | What to watch |
|---|---|---|
| Thin origami paper | Use it for the first complete tulip | Keep the square edges aligned |
| Ordinary printer paper | Cut a square and practice the sequence | The layered sections may feel stiffer |
| Light patterned paper | Try it after your practice flower | A small pattern leaves the fold lines clearer |
| Heavy cardstock | Keep it for a card, tag or display base | It is awkward for the tightly layered bloom |
| Very thin tissue paper | Save it for another flower project | It can tear while the bloom is opened |
If you are cutting a square from a rectangular sheet, bring one corner across until two adjacent edges line up. Crease the diagonal and trim away the extra strip. Open the square and check that the corners meet neatly when folded. You can also measure with a ruler if that feels easier.
Keep the first square fairly large. A tiny flower looks appealing on a tag, but its little pockets are harder to open and tuck. Learn the sequence at a comfortable size, then reduce the paper for a later project.
Supplies for your origami flower
- One square of thin paper for the flower head
- A clean, flat surface with enough room to turn the model
- A ruler and scissors if your paper needs cutting into a square
- Optional green paper for a stem or leaf
- Optional paper glue for attaching the finished flower to a separate project
A bone folder is optional. Your fingertips are enough for the folds, especially with thin paper. Press along a crease after checking the edges, instead of making a strong crease first and trying to correct it afterward.
Put the extra supplies to one side while folding the head. Glue, stems and decorations can wait until you know how large the finished bloom is. If you are making several, keep one practice model beside you and complete a flower before preparing a whole batch of squares.
Download your origami flower folding companion
Keep the seven-stage guide beside your paper while you fold. Each five-page PDF includes a materials reminder, the folding diagrams and finished-project inspiration. Choose the size that matches the paper in your printer.
Download the US Letter folding guide
Print at 100% or Actual Size, with Fit or Shrink turned off. The reference line on page one should measure 5 cm. These are folding instructions, not a cut-out template. For personal use.
Make an origami flower in seven stages
This is the traditional inflated tulip, rather than a flat flower silhouette. The stages below describe the folding sequence. For a close view of each movement, use Kelly Tan’s illustrated tulip tutorial at Origami.me or the Origami-Fun tulip diagrams alongside the written guide.
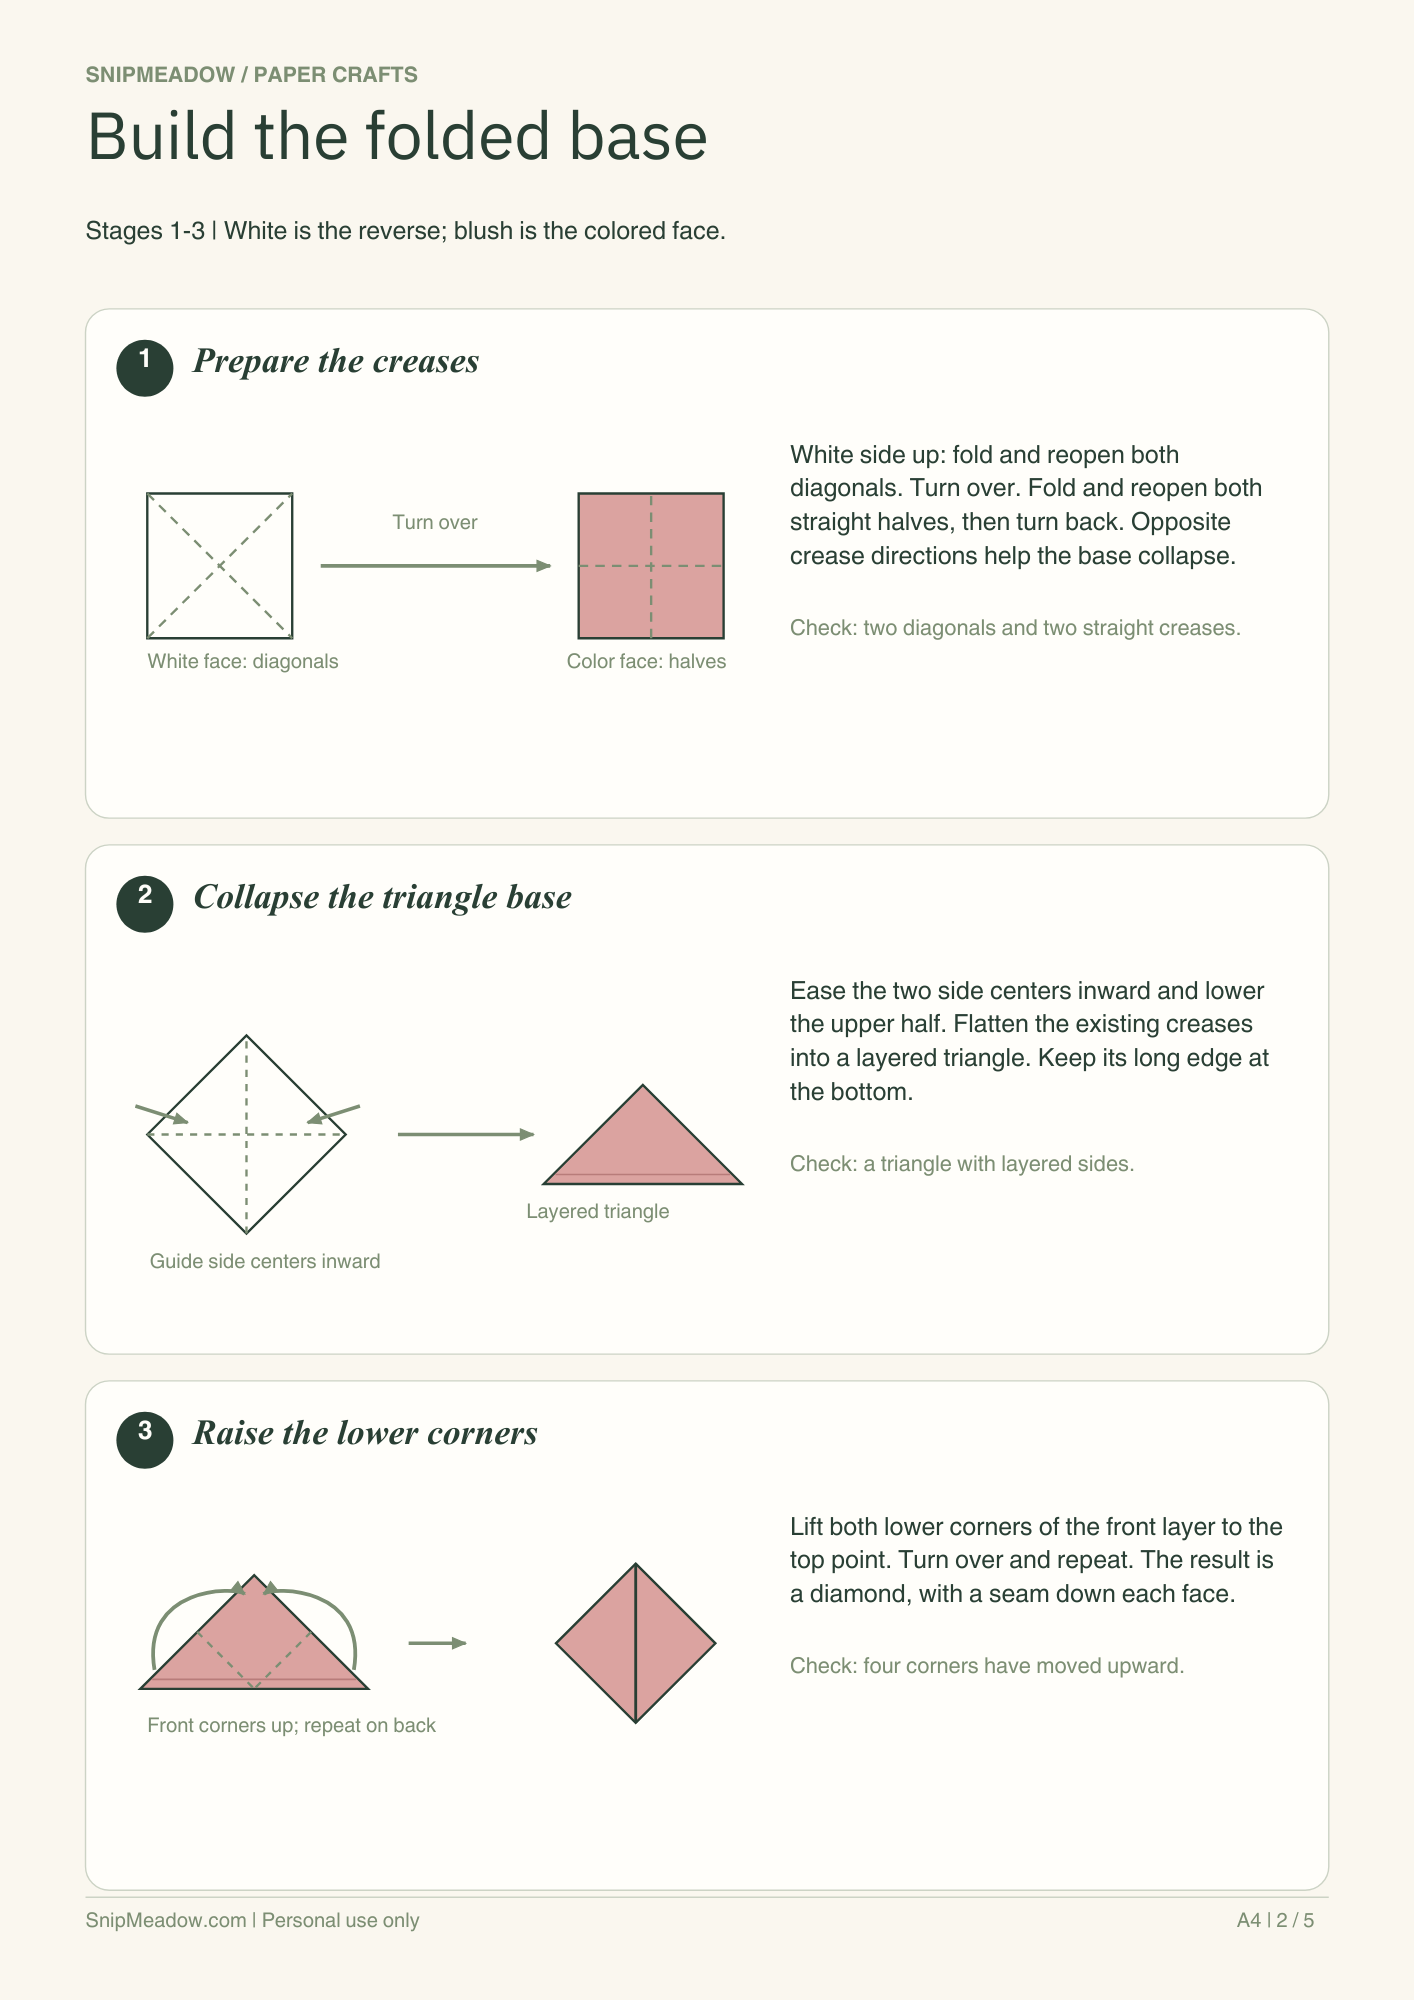
1. Prepare the creases
Begin white side up. Fold and reopen both diagonals. Turn the sheet over, fold and reopen it in half in both directions, then turn it back. The diagonal and straight creases should bend opposite ways.
2. Collapse the triangle base
Bring the two side centers inward while lowering the upper half. Let the existing creases form a layered triangle, called a waterbomb base. Flatten it gently, with its long edge at the bottom and point at the top.
3. Raise the lower corners
Lift the front layer’s two lower corners to the top point. Crease them, turn the model over and repeat on the other face. You now have a diamond with folded flaps on both sides.
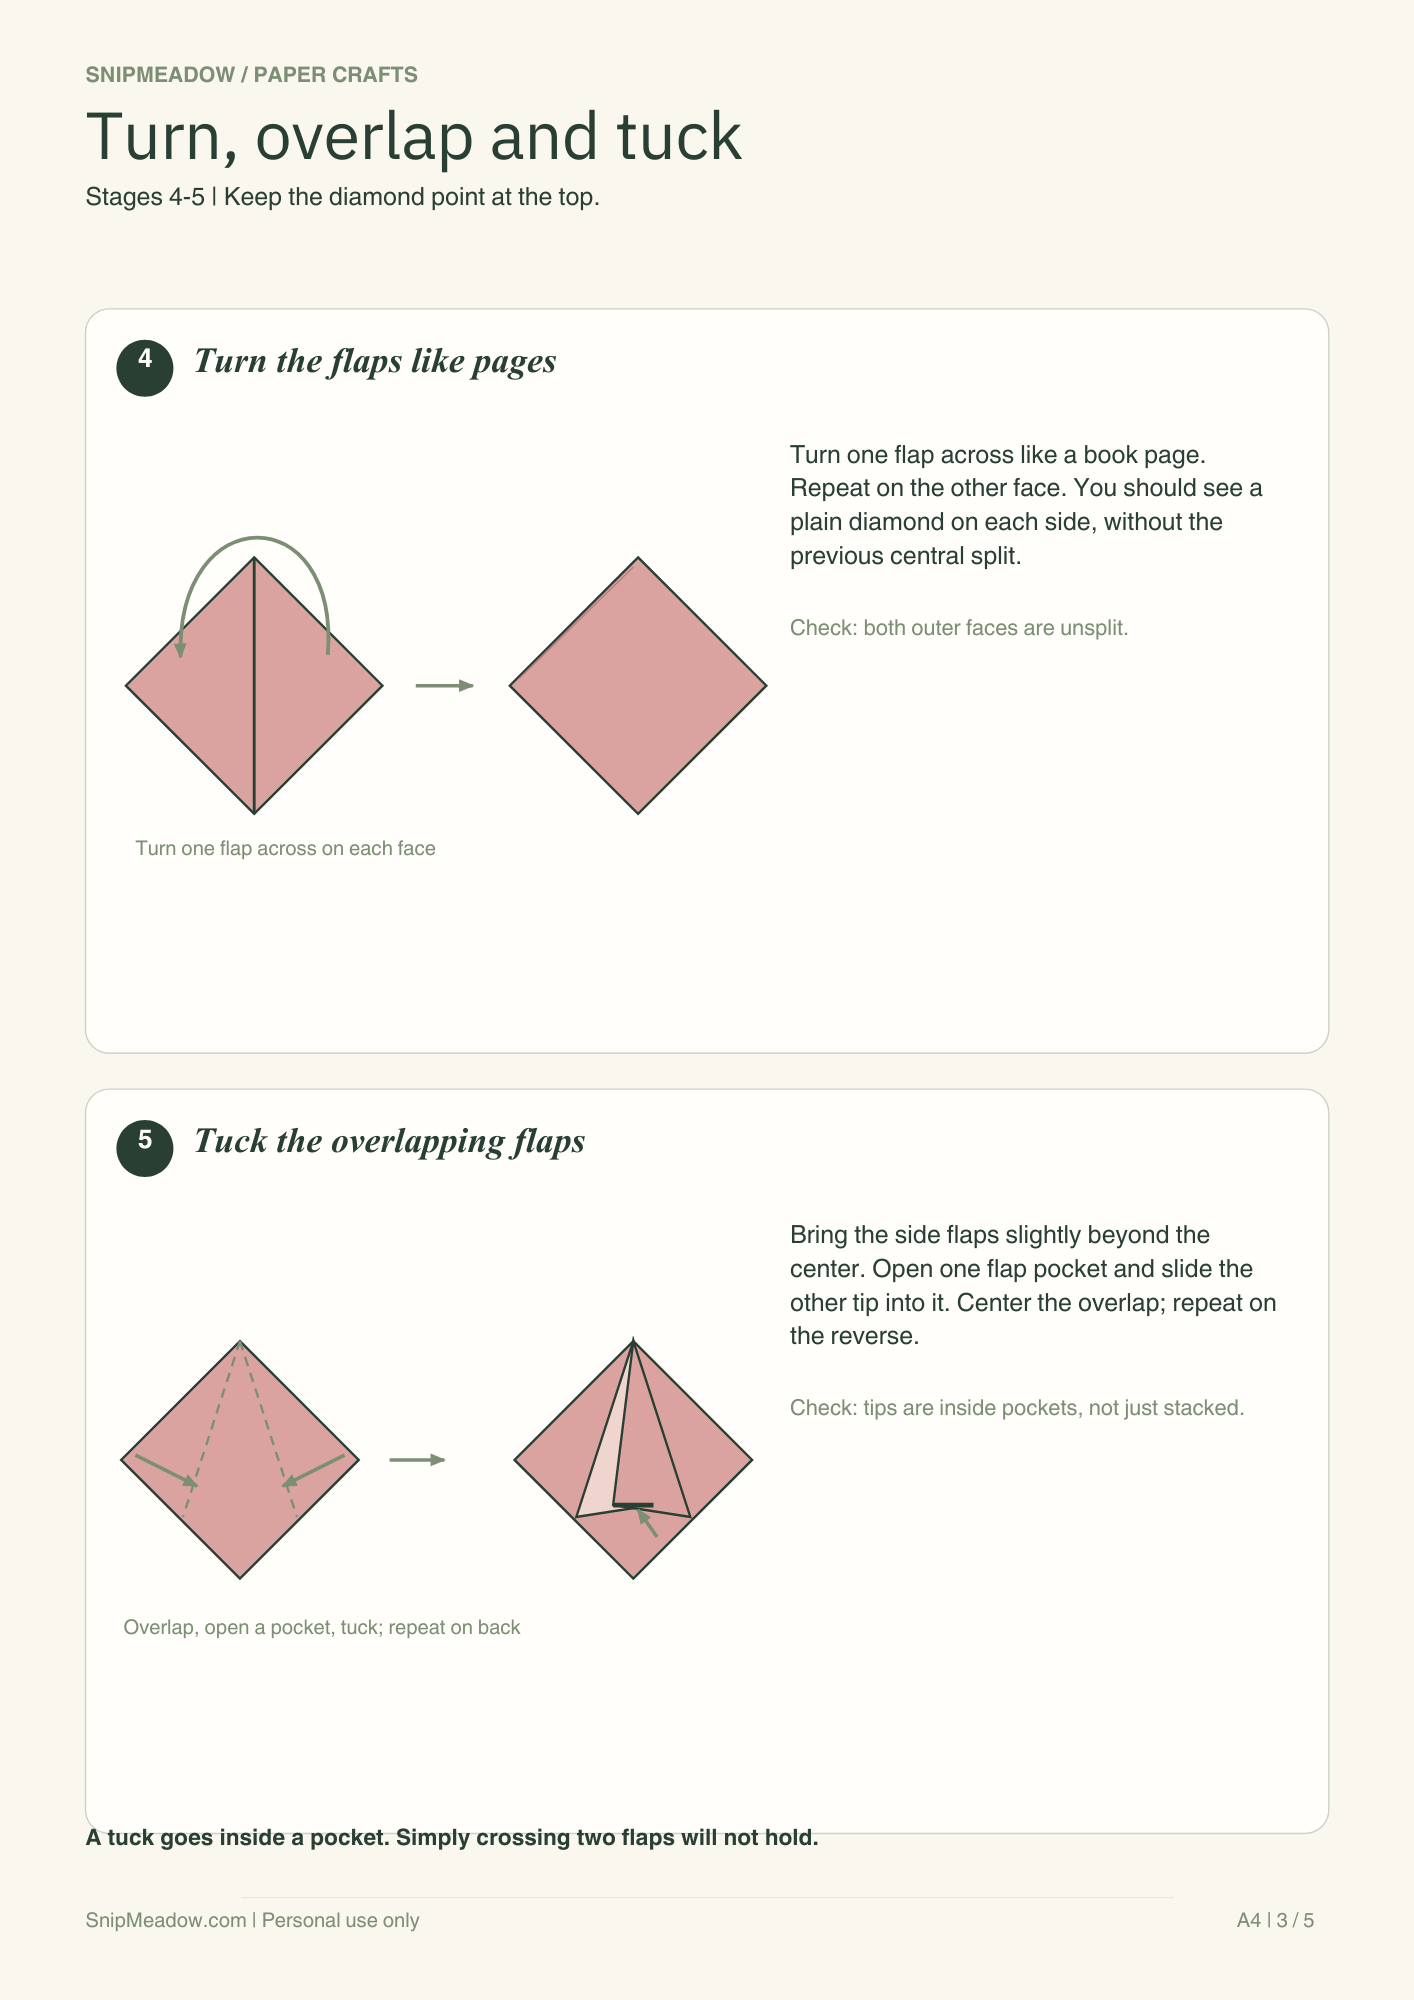
4. Turn the flaps like book pages
Move one front flap across to the opposite side, as if turning a page. Do the equivalent on the back. Each outer face should now be a plain diamond rather than two flaps meeting along its center.
5. Tuck the overlapping flaps
Bring the side flaps toward one another, slightly beyond the center. Open one flap’s pocket and slide the other flap inside. Keep the overlap centered and flatten gently. Turn over and repeat to secure the second face.
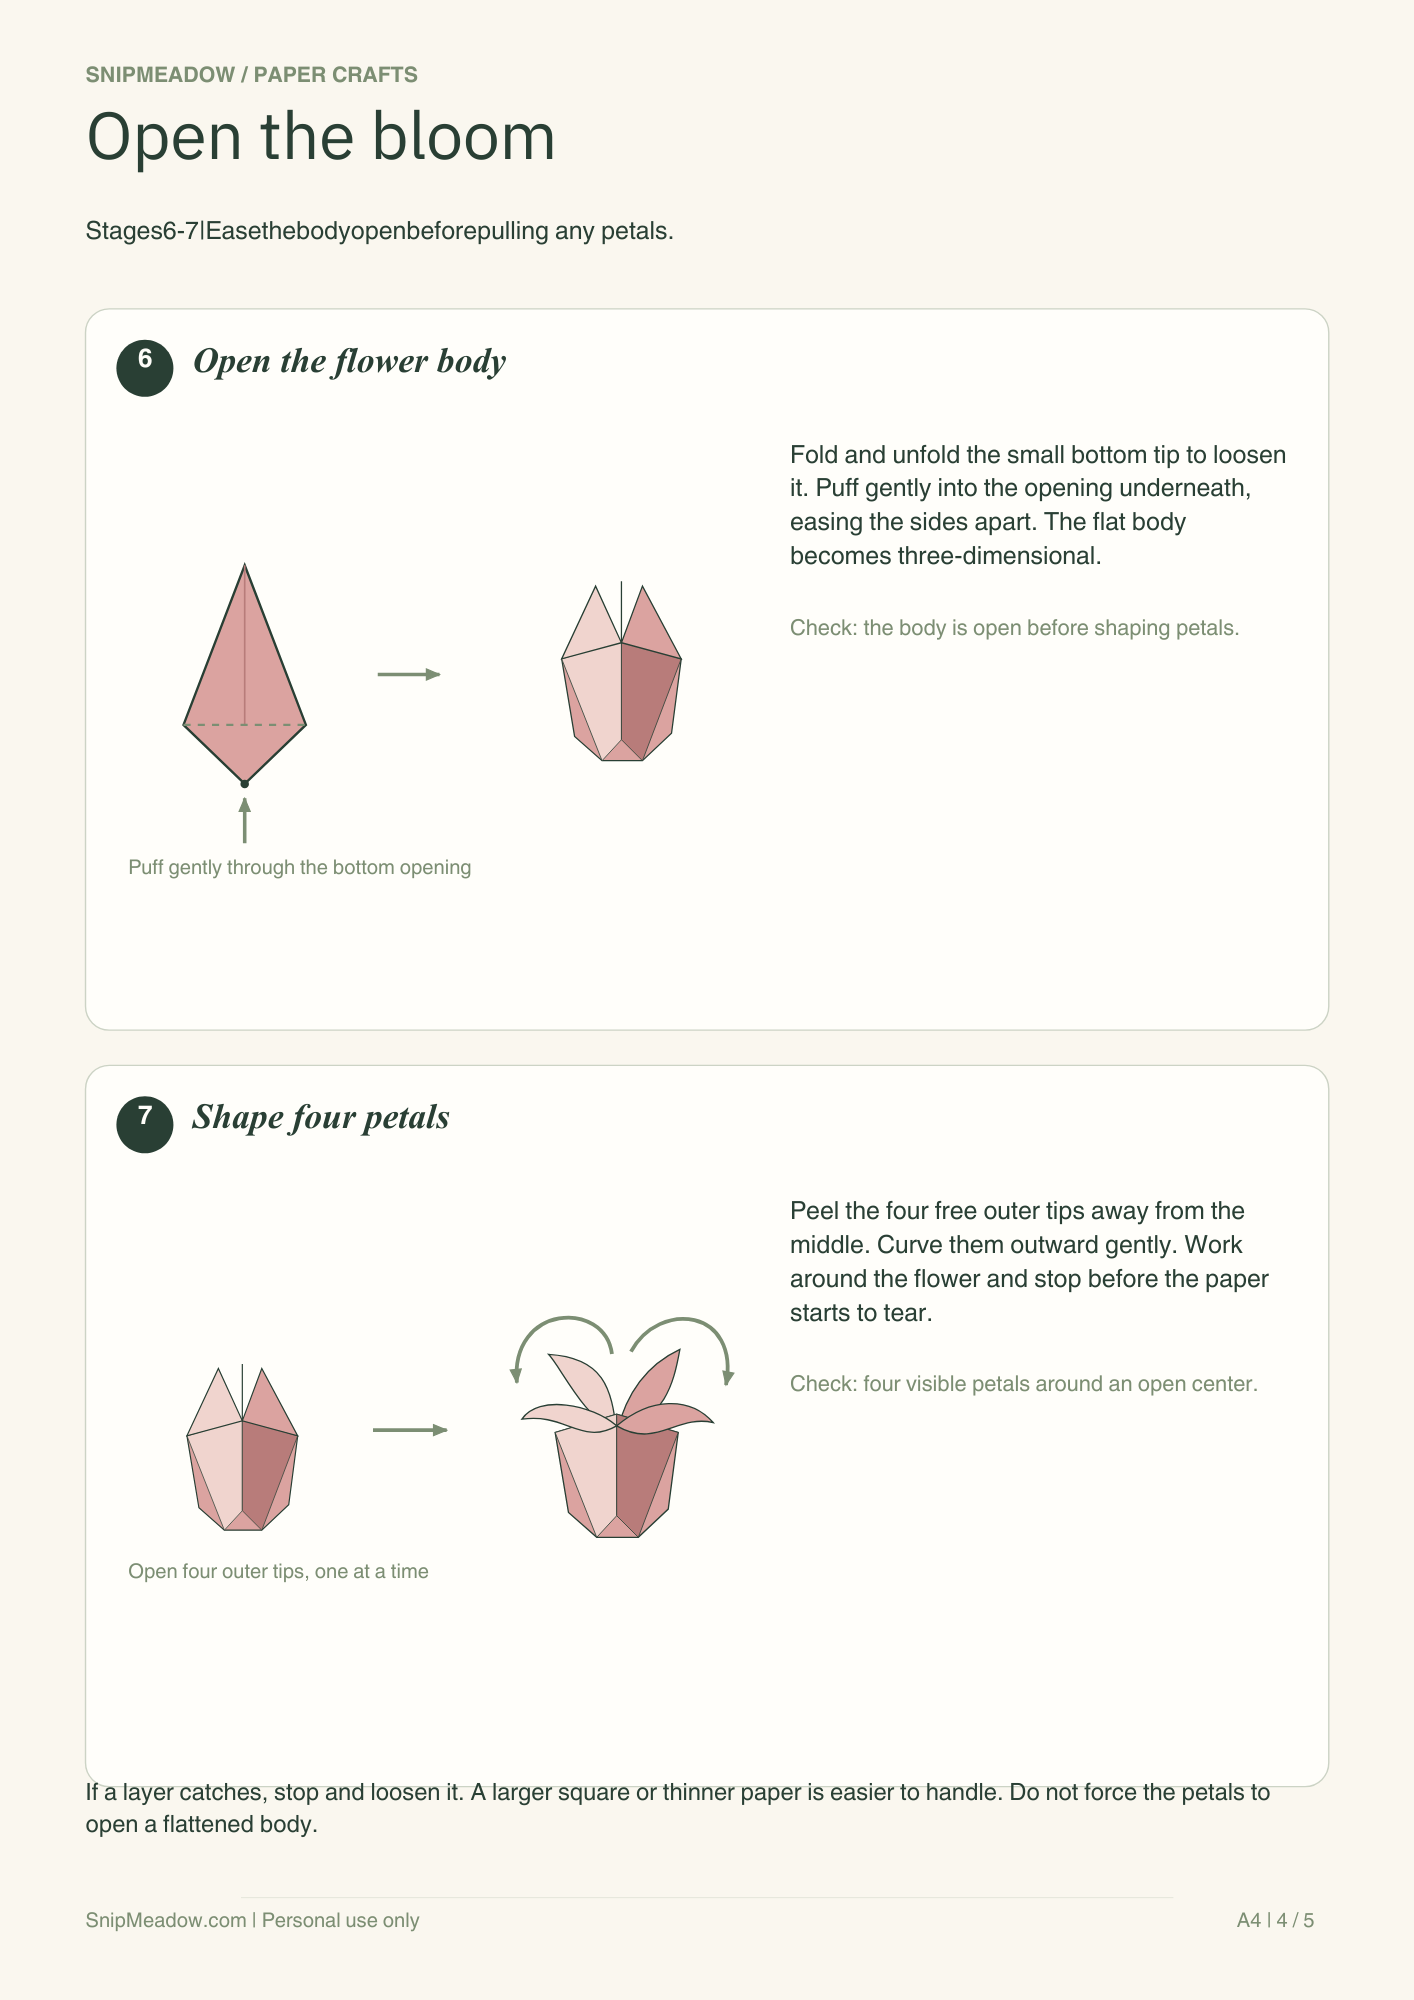
6. Open the flower body
Loosen the small bottom point with a fold and unfold. Find the tiny opening underneath and gently puff air into it. Ease the sides apart as needed, allowing the flattened shape to expand into a rounded body.
7. Shape the four petals
Peel the four free outer tips away from the center, one at a time. Curve each outward gently. Stop when the flower has an open center and four visible petals; sharp pulling can split a tip or loosen a tuck.
Set the bloom down before adding anything else. Look at it from above and from the side. You can leave the petals more upright for a closed tulip or ease them outward for a wider shape. Small differences between petals are fine; avoid repeatedly opening the same crease just to make every edge identical.
Write the starting square size on a scrap of paper and keep it with your sample. That small note is useful when you come back to make a matching flower. Photograph the result beside a ruler if you want a quick record of its size without storing every practice piece.
Add a stem to your origami flower
You can display the origami flower without a stem. For an upright arrangement, a narrow rolled-paper tube is a simple craft addition. It uses glue to hold the tube; the folded flower head itself stays unchanged.
- Roll a green strip. Start with a strip about 2 × 8 inches or 5 × 20 cm. Roll diagonally from one corner into a narrow tube. Adjust the starting angle if the tube becomes too wide.
- Secure the edge. Glue the final loose corner to the tube and let the join dry. Trim a ragged end if needed.
- Test the fit. Gently offer the narrow end to the opening beneath the bloom. It should enter without stretching or tearing the flower. Make a thinner tube if it does not fit.
- Add an optional leaf. Cut a slim leaf from an offcut, make a light crease along its length and attach its base to the stem.
Check the flower’s balance before making several stems. A paper tube is lightweight, so a tall stem may bend under a wide bloom. Shorten it, use a smaller flower or place the arrangement in a container that supports the lower part of the stem. Keep glue away from the petals.
For a hanging decoration or a box topper, skip the stem. Decide how the bloom will sit before attaching it permanently. A loose arrangement on the table lets you change the spacing without damaging finished folds.
Five ways to use your origami flower
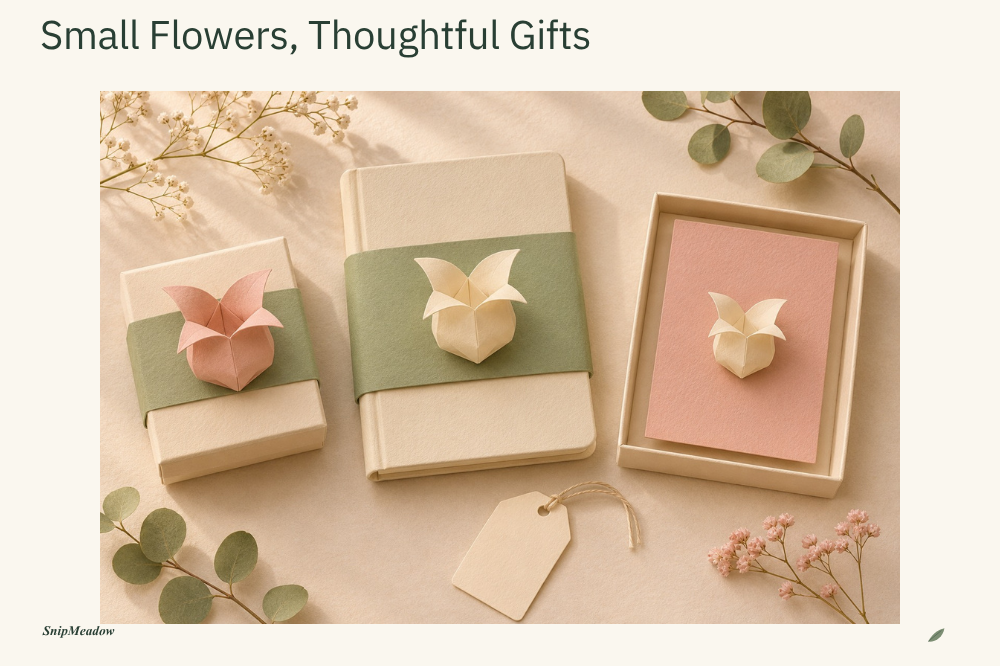
A small gift-box topper
Wrap a paper band around a box and arrange one bloom near the join. Attach the base of the flower to the band rather than to the box lid. The decoration can then slide off as one piece. A small leaf or name tag is enough beside the flower; leave the folded petals easy to see.
A removable journal wrap
Make a paper sleeve that slides around the closed journal, then decorate its front with a tulip. Remove the sleeve while writing. This keeps the raised flower outside the pages and gives you room to change the decoration with the season. Use a flat drawn flower inside the journal if you need the pages to close evenly.
A hand-delivered card
Choose a sturdy card blank and try the flower’s placement before gluing. Leave room for a short greeting beneath it. A dimensional bloom can be crushed inside a tight envelope, so hand-deliver the card in a shallow box or use packaging with enough clearance above the petals. Our collage art ideas offer simple backgrounds for the card.
A three-flower desk arrangement
Fold three tulips in related colors and give them slightly different stem lengths. Arrange them in a small dry container, keeping the blooms apart. Try two blush flowers and one cream flower with matching sage stems. Start with three so you can judge the spacing before making a larger bunch.
A flower and tag gift set
Place a single bloom beside a small gift and add one of our botanical gift tags. Repeat one color in the tag backing or paper band. Keep the recipient’s name on a separate flat area so it remains readable among the folds.
If you enjoy making different kinds of blooms, our paper flower guide includes a rolled rose, a tissue flower and a loop-petal daisy. Those use cutting, rolling or glue and give a different result from this folded tulip.
Fix common folding problems
| What you notice | What to check |
|---|---|
| The first triangle will not collapse | Reopen the sheet and check that the straight and diagonal creases were made from opposite faces. Guide the folds before pressing. |
| A flap will not stay tucked | Check that the two flaps overlap, and slide one into the other’s pocket rather than laying it on top. |
| The flower stays flat | Loosen the sides gently and check the bottom opening. Do not pull on the petal tips to force the body apart. |
| The layers are difficult to move | Try a larger square or thinner paper for your next attempt. |
| A petal begins to tear | Stop shaping that tip. Keep the bloom as a practice piece and open the next flower more gently. |
| The stem bends | Shorten the stem, support it in a container or use a smaller flower. |
When a step feels wrong, return to the last shape you recognize. Compare the model’s open edges and folded edges with the reference before making another crease. Rotating a model is easy to miss, especially when both sides of the paper are the same color.
Keep completed flowers in a shallow box with space above the petals. Place them in a single layer and avoid resting other supplies on top. Store the box somewhere dry. If you are transporting an arrangement, support the container separately so the stems do not carry its weight.
Origami flower questions
Can I make an origami flower with normal paper?
Yes. Cut printer paper into a square and use it to learn the sequence. The thicker layers may be less flexible than thin origami paper, especially when tucking and opening the bloom. Try a larger square if the folds feel cramped.
Does this flower need glue?
The tulip head holds through folded and tucked paper. Glue is optional when you attach the completed flower to a card or gift band. The rolled stem described here uses glue to secure its loose edge.
Can I put the tulip inside a journal?
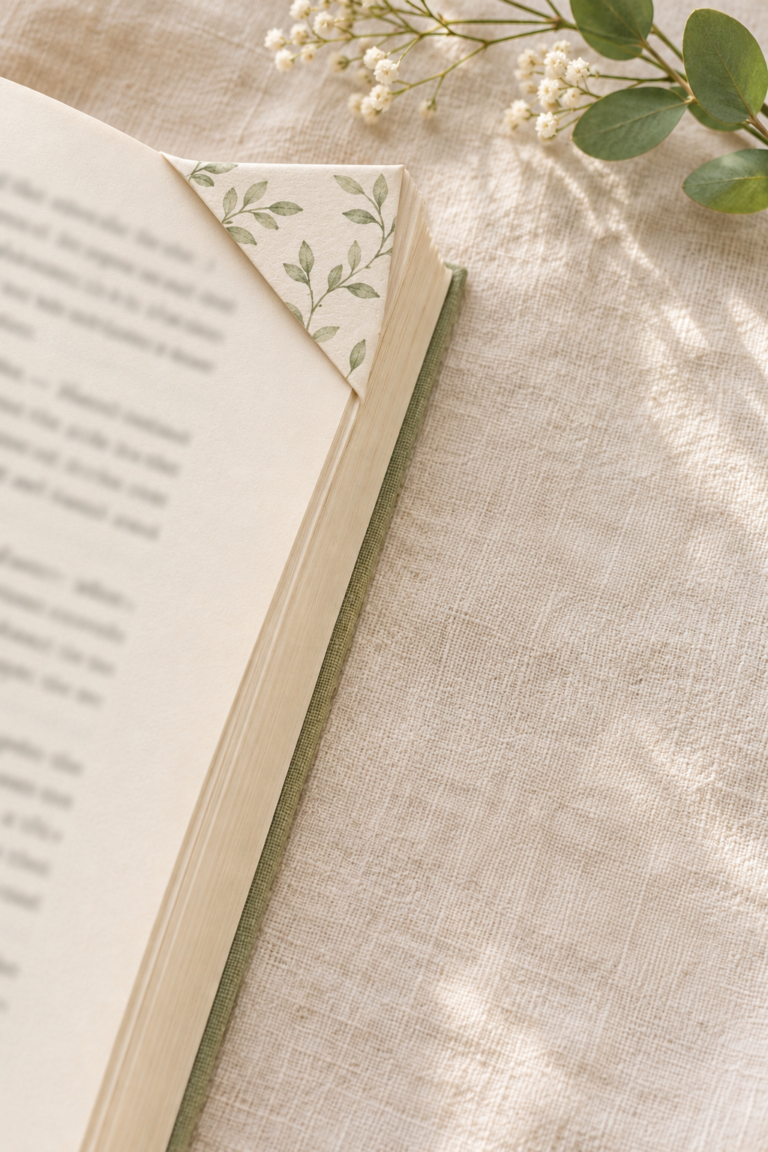
The inflated bloom is too bulky for most closed journal pages. Use it on a removable cover wrap or display it beside the notebook. For a smaller folded project that sits on a page corner, try our origami corner bookmark.
Can I make a bouquet from different paper sizes?
Yes. Fold a sample of each size before cutting a full batch. Arrange the finished blooms together and choose stem lengths afterward. Keeping one shared color in the stems or leaves helps the varied flowers look connected.
What should I practice first?
Practice the triangle base and the tucked flaps. These parts establish the shape before the flower opens. Use plain paper and pause at each stage to compare the model with the illustrated reference. Save decorative paper for the next attempt if you need to refold several times.
Begin with one origami flower and one place to use it. A neatly folded tulip on a simple paper band can finish a gift without a whole bouquet. Keep your first sample, note its paper size and let it guide the next bloom.
Looking for another little project? Explore Journaling, Printables or Paper Crafts.