
How to Draw a Daisy: 6 Easy Steps for Your Journal

Learning how to draw a daisy starts with one small circle and a few rounded petals. This beginner tutorial breaks the flower into six manageable steps, so you can add a little botanical detail to a journal page, reading note or handmade card. You can follow along on ordinary paper; the free practice sheets are optional.
Our example is a simple, front-facing doodle with twelve petals, one curved stem and two leaves. Twelve is a useful practice count for this drawing, not a rule for every real flower. Start with the clear diagram, then let your own lines become a little less even as you grow comfortable.
Table of Contents
Supplies for learning how to draw a daisy
- A pencil and a scrap of paper or an unlined journal page.
- An eraser for small corrections.
- Optional: a fine-tip pen, yellow pencil and green pencil.
Before drawing directly in a journal, test your pen on a spare piece of the same paper. Check for smearing or marks showing through the back. If the paper is thin, draw on a separate scrap and attach it later. Our beginner journal supplies guide has more ideas for working with what you already own.
How to draw a daisy in 6 easy steps
Keep the flower fairly large on your first try: a bloom about two inches across gives you room to place the petals. The diagram uses terracotta for new outlines and dark green for earlier lines. Follow the shapes in order; the first circle remains as the center of the finished flower.
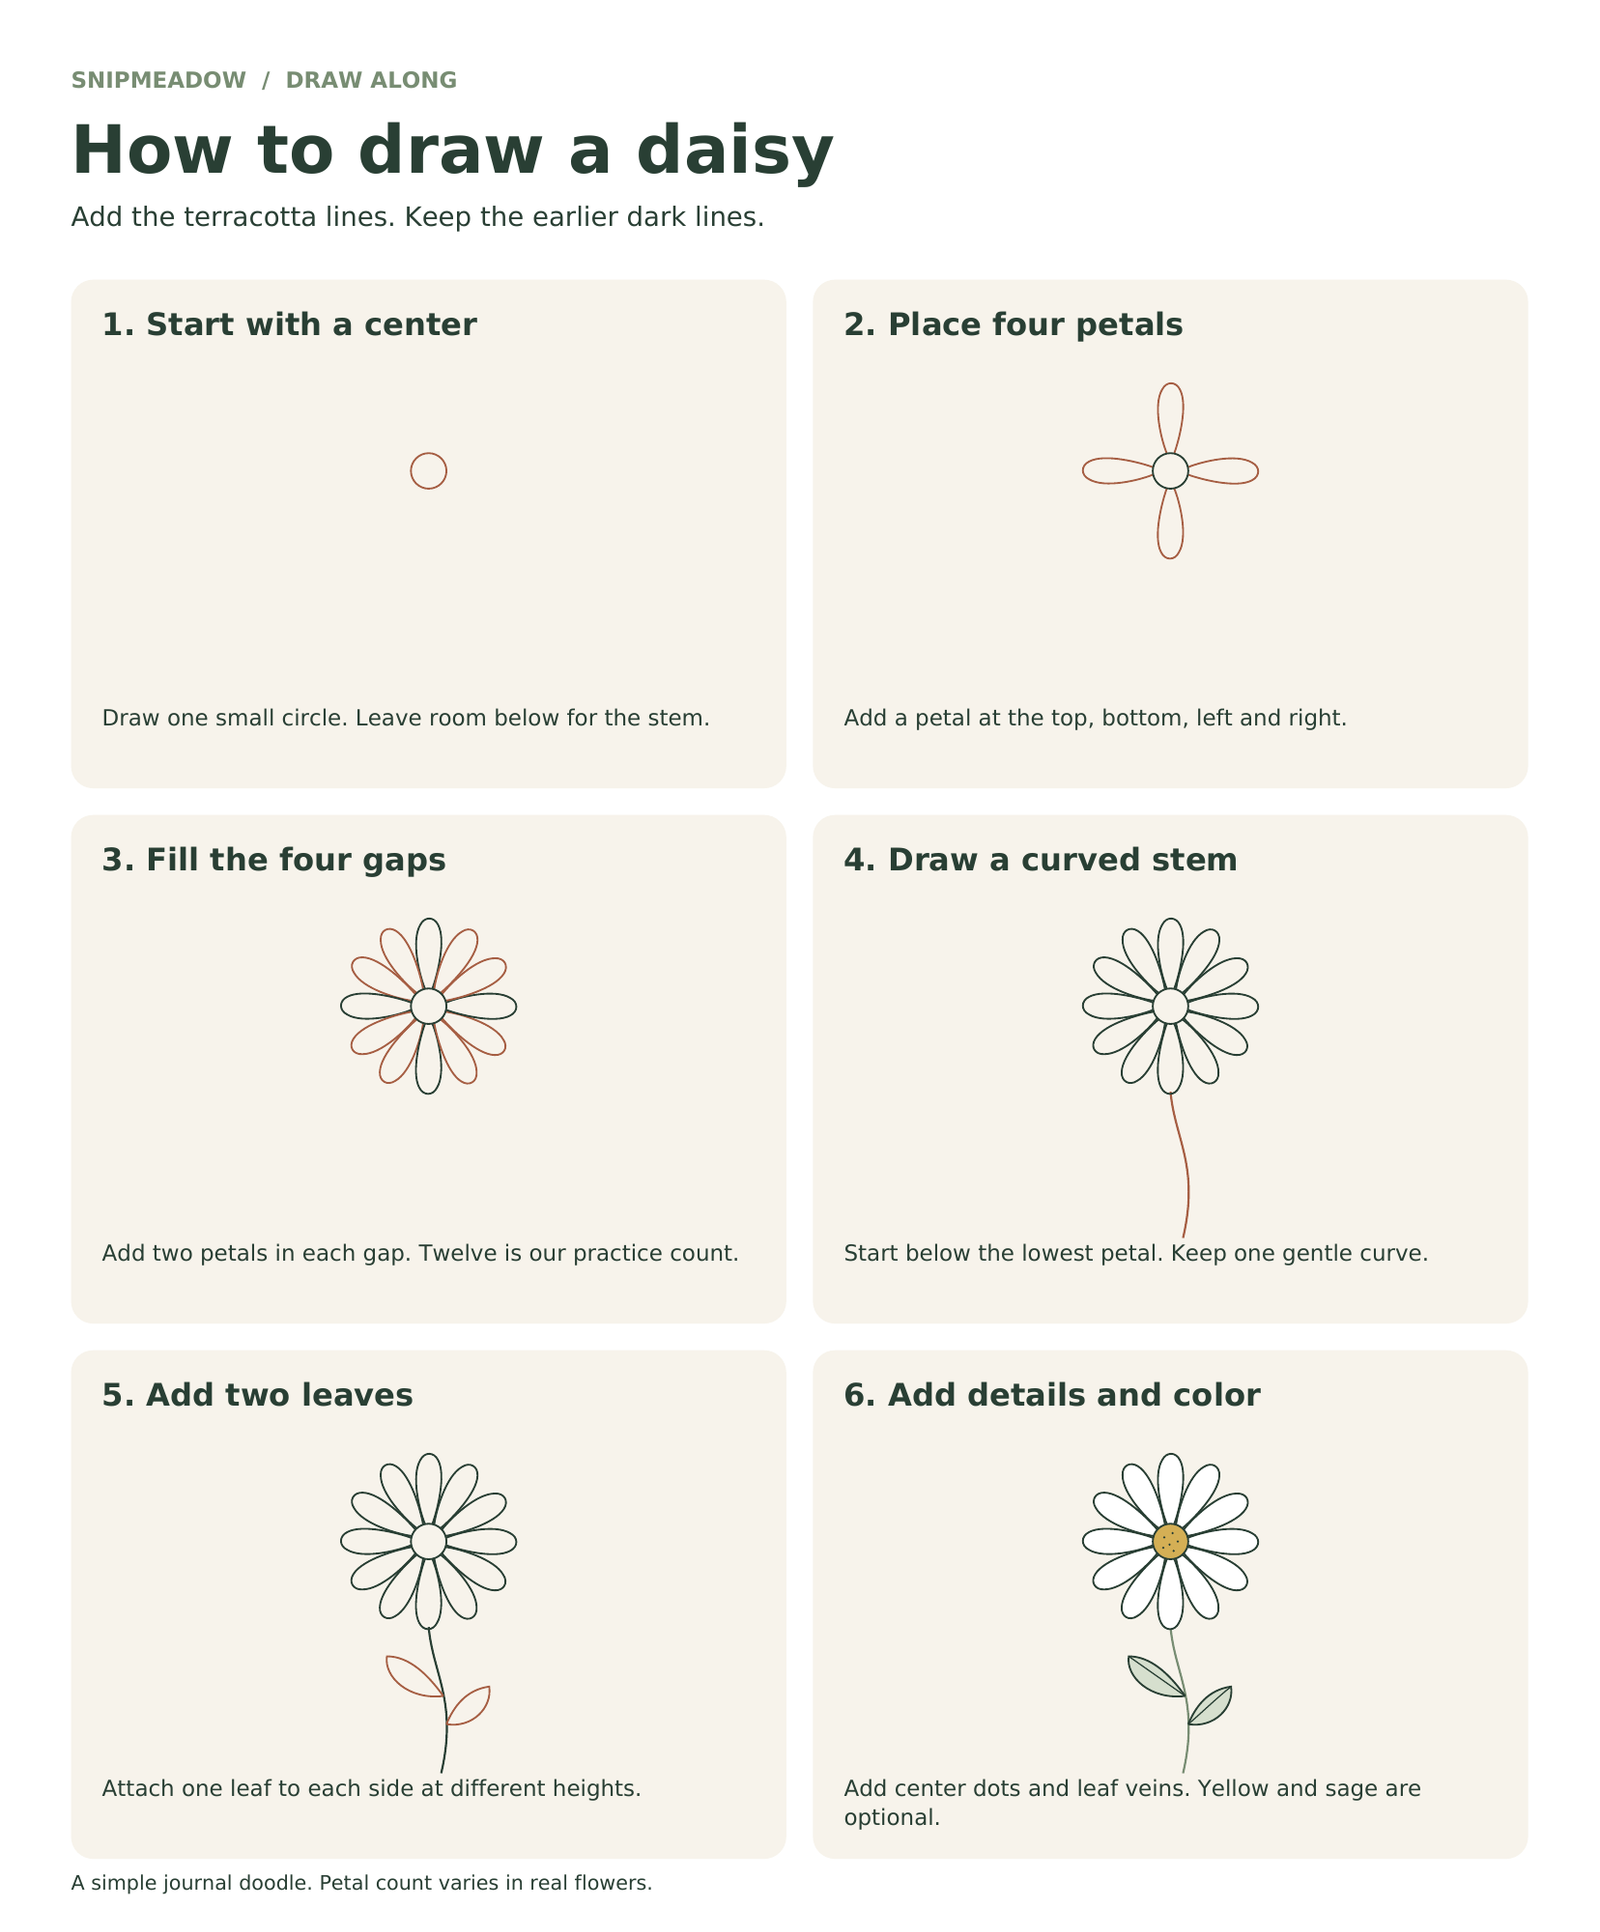
1. Start with a small center circle
Place a small circle in the upper half of your drawing space. Leave room around it for the petals and more space below for the stem. Keep your pencil pressure light enough to correct a wobble, but do not worry about making a perfect circle. You will keep this outline rather than erase it as a guide.
2. Add four anchor petals
Draw one long, rounded petal above the circle, one below, one to the left and one to the right. Think of the four points on a compass. Each petal starts at one point on the center edge, widens slightly, curves around its tip and returns to another point on the edge. Aim for similar lengths so the flower has a clear shape.
3. Fill the gaps with eight more petals
Add two slender petals between each pair of anchor petals. Work around the center one gap at a time. The new petals should point outward from the circle rather than all leaning in one direction. Four anchors plus eight new petals make twelve in this example. If a gap is narrow, make those petals slimmer instead of forcing them across an existing outline.
4. Give the flower a curved stem
Start just below the lowest petal and draw one gentle curve downward. Let the line bend slightly to one side and ease back near the bottom. Keep it shorter than the space you left on the page so the flower does not feel squeezed against the edge. A single line is enough for this small journal doodle.
5. Attach two simple leaves
Choose two points at different heights on the stem. From the higher point, curve outward to a leaf tip on the left, then return with a second curve. Add a smaller leaf on the right from the lower point. Both leaf bases should meet the stem. This small difference in height keeps the arrangement from looking like a perfectly mirrored symbol.
6. Add a few details and optional color
Place a few tiny dots inside the center and add a fine line through each leaf. If you want color, use a soft yellow center and muted green leaves. Leave the petals white or use the color of your paper. You can stop with the pencil drawing, or trace the outlines with a pen after testing it. Let any ink dry before gently erasing unwanted pencil marks.
Small fixes when your daisy looks uneven
As you learn how to draw a daisy, change one thing at a time. A tiny correction is easier to judge than redrawing the whole flower.
- The bloom looks crowded: leave the center circle clear and make the next petals narrower. On a fresh try, make the center a little larger.
- The flower leans: compare the four anchor petals first. A slightly shorter petal on the longer side can balance your next drawing.
- The leaves seem to float: reconnect their bases to the stem with short curves. Avoid adding a second long stem just to reach a leaf.
- The lines look heavy: try a lighter pencil touch or a finer pen. Practice the petal shape on a scrap before returning to the flower.
Three ways to use a daisy in your journal
- Beside a date: draw one small flower in the outer margin, with the stem pointing toward the bottom of the page.
- On a reading note: place a daisy beside a small book doodle and leave the middle of the card free for a quotation or a thought.
- As a corner detail: draw a flower near one corner and keep the leaves outside your writing area. Our botanical journal corner ideas offer more placement inspiration.
Try each arrangement loosely before adding glue, stickers or another drawing. If the page already has several decorations, one daisy head without a stem may be enough. Repeating the same sage or yellow elsewhere on the page can connect the flower with your existing supplies.
Download the free daisy practice sheets
The how to draw a daisy practice pack contains the same exercises in two paper sizes: A4 (210 x 297 mm) and US Letter (8.5 x 11 inches). Download only the version that matches the paper in your printer.
- Page 1: the complete six-step reference, with a one-inch size-check line.
- Page 2: a light example to trace, an empty box for a fresh drawing, and a small writing area for trying a journal detail.
Print in portrait orientation, one PDF page per sheet, at 100% / Actual size. For help finding the setting, see Adobe’s PDF page-size guide. Print page one first and measure the check line: it should be one inch, or 25.4 mm. If the check line prints too short or too long, reopen the print settings and turn off automatic scaling before trying again. The layout and page dimensions have been checked digitally; a physical printer test has not been completed.
These practice sheets are free for your personal use. Please share a link to this article instead of redistributing the PDFs, and do not sell the files or finished items made from the sheets. You can follow the tutorial on your own paper without downloading anything.
Questions about how to draw a daisy
How do I make a daisy drawing easy enough for a small journal?
Learn how to draw a daisy at a larger size first, then repeat the center-and-petals sequence in a smaller space. Skip the center dots and leaf veins if they become cramped. A few clear shapes usually read better than many tiny details on a narrow margin.
Do all daisies need twelve petals?
No. Twelve is the count used to organize this beginner exercise. You can vary it in later drawings, especially if you work from a flower or reference photograph. When practicing the six-step diagram, keeping the same count makes it easier to compare your progress with the example.
Can I learn how to draw a daisy with just a pen?
Yes. Use a scrap of paper for your first attempt and keep the marks simple. Pencil gives you more room to adjust proportions, but it is optional. With a pen, accept small variations and move on to the next petal rather than repeatedly darkening a line that already works.
What should I practice after this daisy?
Repeat the flower three times: once with a shorter stem, once with smaller leaves and once as a head-only margin detail. Keep the center-and-petals method the same. This helps you use what you learned about how to draw a daisy in several journal layouts without needing a whole new technique.



Looking for another little project? Explore Journaling, Printables or Paper Crafts.