
12 Easy Collage Art Ideas + Free Printable Paper Pack
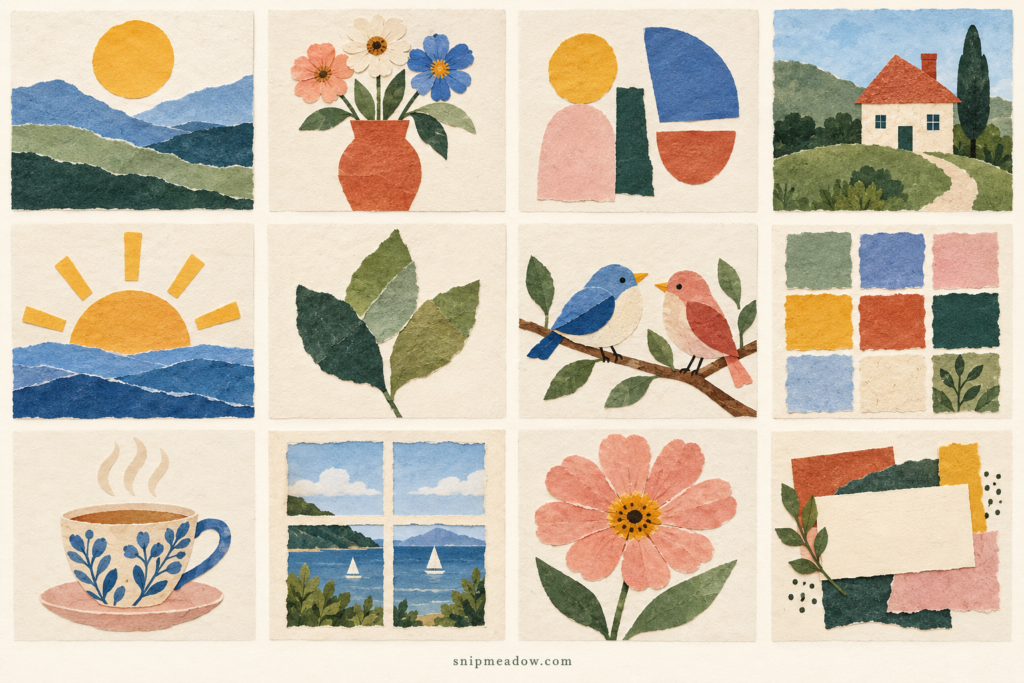
These collage art ideas turn small paper scraps into finished pictures: a torn landscape, a flower vase, a tiny house, a leaf study and more. Each project starts with a few simple shapes, so you can experiment with color and placement before you use any glue. No detailed drawing is needed.
Below you will find twelve beginner projects, one complete first-collage walkthrough, and fixes for common paper problems. The free three-page paper pack includes six colored paper panels, a sheet of simple shapes, six small base panels and three blank word labels. The illustrated gallery shows these collage art ideas; it is not a set of finished artworks included as printable cutouts.
Download the free collage art ideas paper pack, or use magazines, colored paper and clean packaging from your own scrap box.
Table of Contents
What you need for these collage art ideas
Collage brings separate pieces together on one surface. For these paper projects, start with a firm backing, a small selection of paper, scissors and a glue stick suitable for paper. A pencil is optional. You can tear many of the shapes instead of cutting them.
- A base: plain cardstock, a suitable sketchbook page or clean thin cardboard. A small postcard-sized piece is easier to fill than a large sheet.
- Three or four papers: combine light, medium and dark colors. Include at least one plain paper if your other pieces are busy.
- Cutting tools: ordinary scissors are enough. Tear edges when you want softer hills, clouds or background strips.
- Adhesive: a paper glue stick is a practical starting point for thin, flat pieces. Test coated or unusually thick papers on a spare scrap first.
- A clean working surface: keep a scrap sheet beneath the piece you are gluing, and change it when it becomes sticky.
Use copies of treasured photographs or notes rather than cutting an original you want to keep. For printable imagery, choose your own artwork or material you have permission to use. The projects below work with plain colored shapes, so you do not need to collect online images to begin.
Think of the paper pack as a small starting palette. Its pattern panels can be cut into stems, petals, strips and roofs. You can trace a shape repeatedly onto your own paper when you need more pieces. Each gallery image is an illustrative example, not a photograph of a project we have physically tested.
Turn collage art ideas into a finished piece
If you have never made a collage, try the torn-paper hills first. Use a small backing, two or three blue or green papers and one warm yellow scrap. The sequence matters more than exact measurements.
- Choose the sky. Leave the top part of the base plain, or cover it with a pale paper rectangle. Keep this layer thin.
- Tear the distant hill. Tear a shallow curve across a light-colored strip. Place it around the middle of the base, leaving visible sky above.
- Add the near hill. Tear a darker strip with a different curve. Overlap it lower down so the lighter hill remains visible.
- Try a sun. Cut a small circle and place it in the sky. Move it to the left and right before deciding. Keep a little space around it.
- Glue from back to front. Lift and attach the sky, then the sun if a hill overlaps it, then the far and near hills. Apply a thin, even layer of adhesive to each piece.
- Press and check. Press from the center of each paper piece toward the edges. Let the adhesive dry according to its instructions, then check for loose corners.
Photograph the loose arrangement before gluing if you want a reminder of the placement. You can use this same back-to-front method for almost all the collage art ideas below. Change one element at a time when trying a second version: the color, the shape size or the position of the focal point.
1. Torn-paper hills
Use: a pale base, two or three landscape colors and a yellow circle. Tear the papers into long curved strips, making each curve a little different. Put the lightest strip farthest back and a darker strip near the bottom. A small sun gives the picture a clear focal point.
Build it: arrange all the strips so that each remains visible, tuck the sun partly behind one if you like, then glue from the rear layer forward. Trim pieces that extend beyond the base after the adhesive has set enough to hold them. For a journal version, leave the sky open for a date or one sentence about a walk.
2. A simple flower vase
Use: one vase shape, three thin stems, a few leaves and simple flower heads. Cut a rectangle with a narrower top for the vase, or use a rounded shape. Flower heads can be circles, torn patches or a few overlapping oval petals.
Build it: place the stems first, overlap their bottoms with the vase, then add the flowers at different heights. Keep the vase plain if the petals have strong patterns. One flower can face outward while another overlaps a neighbor. Leave space above the tallest flower so the arrangement does not feel squeezed into the edge.
3. Five-shape abstract art
Use: five shapes in three or four colors. Try a circle, a narrow rectangle, an arch, a half-circle and a curved corner. Choose one large piece and let the others support it rather than cutting everything to the same size.
Build it: make one arrangement with the pieces grouped closely, then another with wider gaps. Choose the version with a clear place for your eye to rest. Glue the lowest layer first where shapes overlap. This is one of the easiest collage art ideas to repeat because the same five pieces can make several very different compositions.
4. A little house on a hill
Use: a cream rectangle, a triangular roof, a hill strip, tiny window squares and a door. A small chimney or tree is optional. Pick a roof color that contrasts with the sky so the house stays recognizable.
Build it: place the hill low on the base, add the house body, then overlap the roof slightly over its upper edge. Add the door and windows last. Keep the first version simple; two windows are enough. For a memory page, use colors that remind you of a place rather than trying to reproduce an exact building.
5. A sun above the water
Use: a yellow circle or half-circle, a few narrow ray strips and two blue papers. Cut or tear horizontal strips for the water. Keep the horizon lower than the center so the sun has room.
Build it: arrange the rays behind the sun, leaving uneven but intentional spaces between them. Cover the lower part of the sun with the top water strip. Layer a darker strip below it. A few large rays read more clearly than many tiny ones. Try a rust sun and sage water for a second version with the same composition.
6. A layered leaf study
Use: three green papers with different lightness. Tear or cut three long pointed ovals. They can become a loose leaf cluster, or overlap them to suggest one larger leaf shape. A narrow dark strip can serve as a stem.
Build it: put the largest shape down first, add the lighter piece to one side and the darker piece near the base. Keep the outer silhouette readable. Add a central vein with a pencil only if it helps. Mount the finished study on a cream card and write a color note underneath for a botanical journal page.
7. Two birds on a branch
Use: two oval bodies, smaller wing shapes, triangle beaks and a narrow brown branch. A pointed leaf shape can become a tail. Choose contrasting body colors so the two birds do not merge into one shape.
Build it: arrange the branch at a slight angle, place the birds facing one another and add the wings on top. Use a pen for small eyes and legs after the glue is dry. Keep the first version to simple shapes rather than feather details. A few paper leaves along the branch connect the birds to the setting.
8. A nine-square color collection
Use: nine small paper squares in a related palette. Mix plain paper with a few patterns. The squares can have straight or softly torn edges; aim for a similar size without worrying about perfect precision.
Build it: arrange a three-by-three grid with visible gaps. Move the darkest squares around so they do not all sit in one corner unless that is your intention. Glue one row at a time, checking the spacing before pressing. This collage works as a record of seasonal colors or a way to use scraps too small for a larger picture.
9. A quiet teacup
Use: a rounded cup shape, a small handle, a saucer oval and two or three narrow curves for steam. A patterned cup looks best against a quiet background. If cutting a handle is fiddly, draw it instead.
Build it: place the saucer first, overlap it with the cup and tuck the handle behind one side. Add the steam above with paper strips or a pen. A tiny leaf motif can decorate a plain cup. Turn it into a journal card by leaving a clear area for a note about a calm moment from your day.
10. A window to a small landscape
Use: a small sky-and-hill collage plus four border strips and two narrow crossbars. The frame creates a strong structure, even when the landscape underneath uses only three pieces of paper.
Build it: make the landscape on a separate rectangle. Place the four frame strips around its edge, then add one vertical and one horizontal crossbar. Keep the bars narrow enough to show the scene. Try a seascape, a garden or abstract color bands through the window. The frame can hide untidy outer edges without adding lots of decoration.
11. One oversized flower
Use: a circle for the center, five to seven rounded petals, a stem and one or two leaves. Let the flower fill much of the base. Repeating a simple petal shape gives it rhythm without requiring detailed drawing.
Build it: arrange the petals in a loose ring and adjust their spacing before attaching them. Put the center circle on top to cover the joins. Add the stem behind the flower and the leaves last. Use two similar petal colors for gentle variation, or one bold color if the background already has a pattern.
12. A word-centered collage
Use: two or three contrasting scraps, a plain label and a word or short phrase in your own handwriting. Begin with the word you want to emphasize, such as “notice,” “begin” or “a little quiet.” Leave enough room to write comfortably.
Build it: overlap the background scraps, add one botanical shape at the side and place the plain label where it is easy to read. Write before attaching the label if the surface underneath will be uneven. Keep busy patterns away from the lettering. For a longer personal note, adapt the arrangement using our memory journal page guide.
Wrinkles, loose edges and busy layouts
My thin paper wrinkles when I glue it
Start with a smaller piece and a thinner, even application of adhesive. Test on an offcut before assembling the final picture. A wetter adhesive can behave differently on thin magazine paper than on cardstock. Press gently from the center toward the edges, and follow the adhesive’s drying instructions rather than adding a second wet coat to fix the first.
The corners keep lifting
Check whether the adhesive reached the edges and whether the paper has a slick coating. Try the same paper on a spare base. Use an adhesive suitable for that surface, apply a small amount where needed, and press it flat while it sets. Avoid adding wet glue over the entire finished image just to hold one corner.
My collage looks crowded
Remove one piece before adding another. Choose one focal shape, vary the sizes and leave some plain background visible. If two patterned papers compete, separate them with a plain layer. A smaller palette often makes the picture clearer.
The base starts to curl
Use a firmer base for the next attempt and reduce excess moisture. Let the work dry fully according to the adhesive instructions. If gentle flattening is appropriate for your materials, protect the artwork from sticking and avoid pressing raised details. Test a scrap first; papers and adhesives do not all respond in the same way.
For another way to practice cut-and-torn shapes, Arts for Learning Northwest’s collage activity offers a simple sequence of arranging shapes before gluing them. Our twelve projects and printable designs are original SnipMeadow material.
Printables for these collage art ideas
The pack has three pages. Page one contains six small colored paper panels with simple patterns. Page two contains circles, an oval, rectangles, a rounded square, leaves, triangles and petal-like ovals. Page three has six 2 x 3 inch base panels and three blank word labels. Cut, tear, overlap or trace the pieces to make your own versions of these collage art ideas.
Download A4 PDF
Download US Letter PDF
Print the version that matches your paper at 100% / Actual Size; page two has a 5 cm check line. Use ordinary printer paper for thin layers. If your printer supports suitable cardstock, page three can become firmer small bases. Colors will vary with your printer and paper. The pack is a collection of simple making materials, not twelve complete ready-to-assemble kits.
No email signup is required. Personal use only: enjoy the pages in your own journals or personal gifts, and share the article link rather than redistributing the files. Page sizes and digital layouts have been checked; physical printing and assembly have not been tested.
Questions about easy collage art ideas
What is the easiest collage for a beginner?
A torn-paper landscape or a five-shape abstract composition is a useful first project. Both let you practice contrast, overlap and spacing with only a few pieces. Choose a small base and finish one simple version before collecting more materials.
Do I need to seal a paper collage?
Not for these simple journal and card projects. A top coat can change color, sheen or paper behavior, so treat sealing as a separate choice for your materials and intended use. Test any product on an offcut rather than experimenting on the finished page.
Can I try these collage art ideas without the printable?
Yes. Tear strips, cut circles and trace simple shapes onto papers you already have. The pack is optional. You can also use its arrangement as a starting palette and substitute entirely different colors.
How do I use a collage in a junk journal?
Keep it small and fairly flat. Leave a writing area around it, or place the finished mini collage beside a date and a short note. Our junk journal page ideas show ways to arrange a focal piece with words, pockets and keepsakes.
What can I do with the scraps that are left?
Sort them into broad color groups and save the useful shapes. Narrow strips can become stems, offcut curves can become hills, and small corners can become roofs or beaks. A small printable envelope can hold a modest set of scraps inside your journal.
Choose one of these collage art ideas and make a small version with three colors. Once it is finished, keep the arrangement and change the palette for a second try. Repeating one clear idea is a practical way to discover which shapes, textures and colors you enjoy working with.


Looking for another little project? Explore Journaling, Printables or Paper Crafts.