
7 Christmas Toilet Paper Roll Crafts + Free Templates

A few empty cardboard tubes can become a tiny winter village, a botanical gift box or a place setting with a handwritten name. These Christmas toilet paper roll crafts bring together seven small projects in cream, sage and natural kraft, so you can make one piece or build a matching collection.
Start with a cottage if you enjoy miniature scenes. Choose a paper band and a wish note for a simpler project, or save a few rings for tree decorations. The free printable companion includes seven pages in A4 and US Letter, with roof and tree patterns, botanical papers, arrangement guides and little writing pieces.
Jump to the free templates, or use the project table to choose what to make first. You can print only the pages you need.
Table of Contents
Choose your Christmas toilet paper roll crafts
| Project | Tube pieces | Printable pages |
|---|---|---|
| Winter cottage | One tube, 80 mm high | 2 + 4 |
| Sage paper tree | One tube, 60 mm high | 3 |
| Pillow gift box | One whole tube | 4; optional note on 7 |
| Six-petal ornament | Six rings, 10 mm wide | 5 |
| Mini botanical wreath | Eight rings, 10 mm wide | 6 |
| Place-name napkin ring | One fresh craft-tube ring, 25 mm high | 4 + 7 |
| Wish-note favor | One tube, about 100 mm high | 7; use your own thin wrapping paper |
One 100 mm tube can supply either the six ornament rings or the eight wreath rings, provided the ends are even. Use two shorter tubes if necessary. Keep offcuts from the cottages and trees for small bands rather than setting aside a whole new roll for every detail.
These cardboard tube Christmas crafts turn the roll itself into a decoration or a container for a short message. Pair them with other Christmas paper crafts, such as our paper Christmas ornaments if you want to add a different paper shape to the tree.
Supplies, tube sizes and printing
- Clean, dry cardboard tubes with firm, even edges; a fresh craft tube for the napkin ring.
- The free PDF in the paper size loaded in your printer.
- Printer-compatible cardstock, around 160-220 gsm, for roofs and the tree canopy; ordinary paper for wraps and notes.
- Scrap card for the ornament and wreath backings.
- Scissors, a ruler, a pencil and a blunt scoring tool.
- A glue stick for flat wraps and paper craft glue for the structural joins.
- Thin thread, a little ribbon and optional paint or paper scraps.
The cottage and tree patterns are designed around tubes 35-45 mm across (about 1⅜-1¾ inches). The cottage tube is 80 mm tall; the tree trunk is 60 mm tall. Measure the outside diameter across the open end. If your tube is much wider, use a narrower one or make a cardstock tube approximately 40 mm across: a strip 136 mm wide gives about 126 mm around the tube plus a 10 mm overlap.
For a decorative wrap, measure the circumference with a scrap-paper strip. Wrap it around the tube, mark where the ends meet, then add 10 mm for the seam. Cut the height to match the tube. Each botanical paper panel is 180 x 85 mm, so it can cover the 80 mm cottage with a little trimming. A whole taller roll may need your own plain paper.
Print single-sided at 100% or Actual Size. Turn off Fit and Shrink. On page 1, check that the metric line measures exactly 50 mm and the imperial line measures 2 inches. Both formats contain the same pieces at the same sizes. Print pages 2 and 3 on cardstock; use ordinary paper for page 4. The notes on page 7 can be printed separately on lighter paper.
The templates have been checked digitally for size and layout. Try a plain-paper fit before making a batch; physical assembly has not been tested. The styled craft images show possible decorative finishes, while the printable preview shows the actual included designs. Keep paper decorations away from heat and flame.

1. Make a little winter cottage
Use one tube cut to 80 mm high, the roof and facade pieces on page 2, and a wrap from page 4. A kraft roof, one red door and a pair of simple windows give the cottage enough character without adding tiny parts.
- Wrap a narrow scrap of paper around the tube to mark an even cutting line. Trim the tube, then cover it with a botanical panel cut to the measured circumference plus 10 mm. Put the seam at the back.
- Cut out the half-circle roof with its glue tab attached. Gently curve the cardstock, fold the tab on the dashed line, and bring the opposite straight edge to that fold. Glue the opposite edge over the tab and let the seam set.
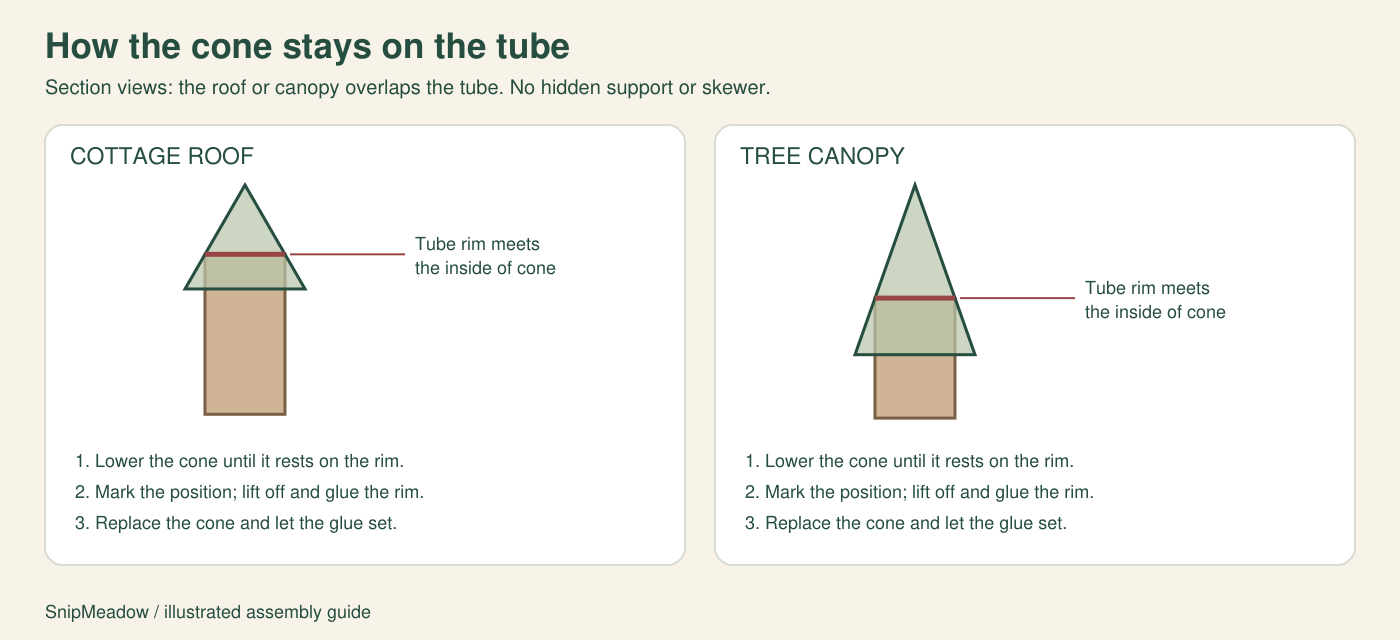
- Dry-fit the cone on the tube. Lower it until its inside rests against the upper rim. The roof edge overlaps the top of the wall; it does not balance on the outer edge of the tube. Mark its position lightly.
- Lift off the roof. Apply a thin line of craft glue around the outside of the upper tube rim, replace the cone at the marked depth and leave upright to dry.
- Glue the door and windows onto the outside. Keep windows below the top 25 mm so the overlapping roof does not hide them. Add a small paper sprig if you like.
This version is an unlit cottage with flat paper windows. You do not need to cut openings in the cardboard. Repeat the page for more houses, or vary the body height after checking that the roof still leaves enough room for the facade.
2. Add a sage paper Christmas tree
The tree uses one 60 mm tube trunk and the canopy on page 3. The cardstock makes the cone; the cardboard roll supplies the trunk and support. The finished canopy is approximately 60 mm across its base.
- Cut out the canopy and its glue tab. Curl the cardstock gently around your fingers without creasing the printed face.
- Fold the tab, bring the other straight edge to the dashed fold line, and glue it over the tab. Hold or clip the seam until the adhesive sets.
- Lower the cone onto the trunk until it rests on the rim. With the suggested tube sizes, about 25-39 mm of trunk remains visible beneath the canopy. Mark the position.
- Remove the canopy, add craft glue around the outside of the upper rim, then replace it. Keep the tree upright while it dries.
- Cut out the star and glue its lower part to the front of the tip. Leave enough overlap to hold it securely. Add a few paper dots if you want extra decoration.
If the cone slips too low, the tube is narrower than expected. A thin paper strip wrapped around the top rim can increase its width slightly; dry-fit again before gluing. For a larger size difference, use a tube within the stated range. A hidden skewer is not part of this design.
3. Fold a botanical pillow gift box
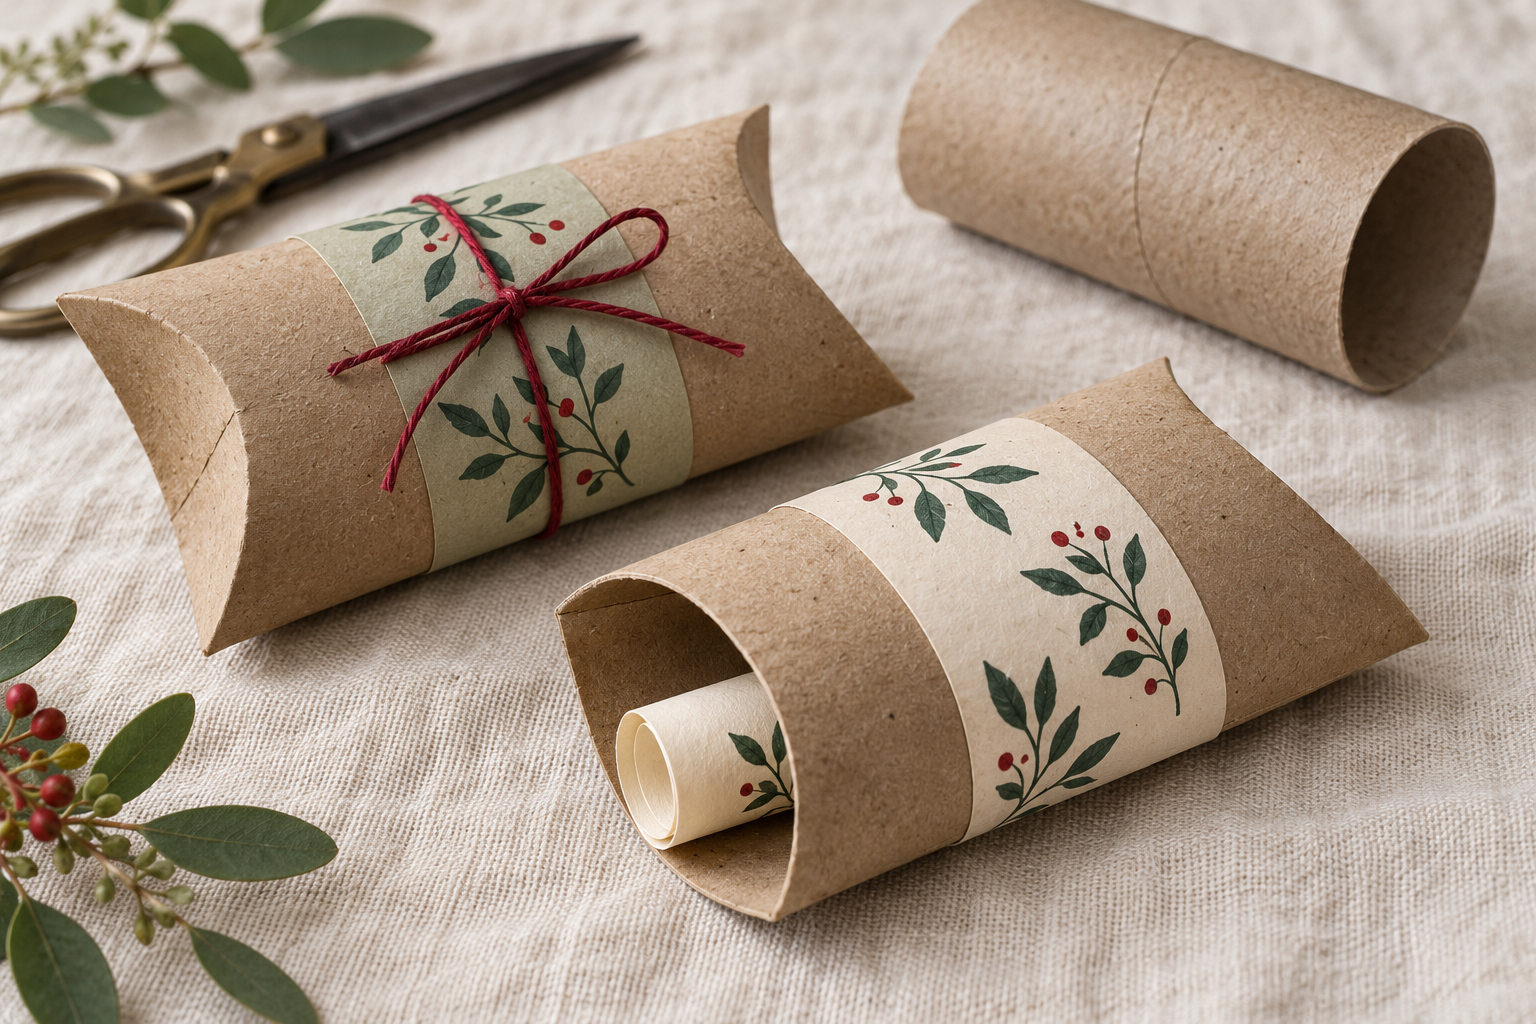
A tube can become a small curved box with just four end folds. Use it for a rolled note or a lightweight non-food trinket. Check the available space before choosing the contents; a standard gift card is not guaranteed to fit.
- Remove loose paper from a whole tube and gently flatten it into two soft side creases. Do not press so hard that the cardboard cracks.
- At one short end, draw a shallow curve from one corner to the other, dipping about 15 mm into the flattened face. Score it gently with a blunt tool. Repeat on the opposite face and at the other end. These are fold lines, not cutting lines.
- Push one scored flap inward, then fold the opposing flap over it. Close one end, open the body slightly and slide in the note. Close the second end in the same way.
- Cut a 25 mm band from page 4. Wrap it around the middle, trim with an overlap and glue the band to itself. Tie a little thread around the box to help keep the flaps closed.
If an end feels stiff, deepen the crease gently instead of forcing the cardboard. The flaps should curve inward and overlap. Make one empty box first to learn how your particular tube folds, then cut matching bands for a small set.

For a larger package, use one of our botanical Christmas gift tags on the outside. Keep the tube box for the small message or keepsake it can comfortably hold.
4. Build a six-petal ring ornament
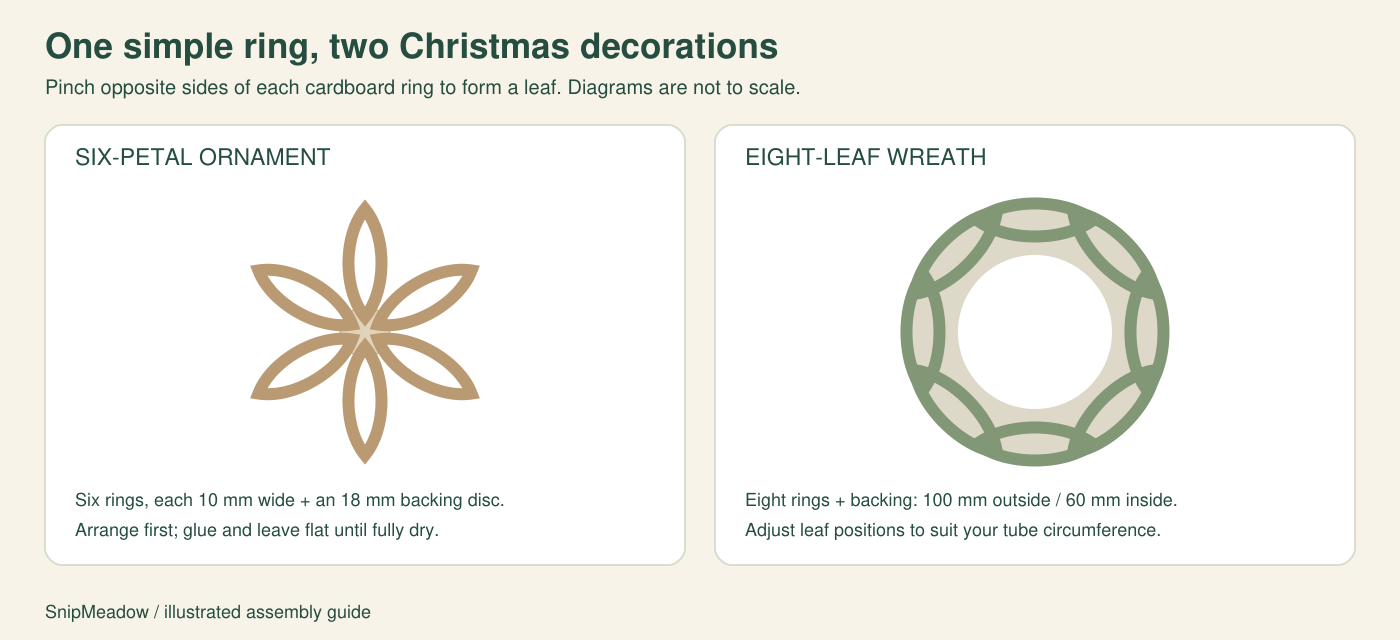
This flower-like ornament uses six cardboard rings, each 10 mm wide, plus an 18 mm backing disc. Page 5 supplies a disc to trace and a pale arrangement guide. The petal outlines are not pieces to cut out.
- Mark six equal 10 mm sections around a tube. Flatten it gently, cut on the marks and reopen the rings enough to shape them.
- Pinch two opposite sides of each ring to make a pointed oval. Keep all six leaves similar in width.
- Trace the backing disc onto scrap card and cut it out. Arrange the inner points of the six leaves around the disc, adjusting the gaps before adding adhesive.
- Glue the lower edges near the inner points to the disc. Add small dots of glue where neighboring leaves touch. Leave the ornament flat until the joins are fully dry.
- Tie a light hanging loop through one outer petal. Keep the cardboard natural or paint the rings and let them dry before assembly.
A tube with a different circumference makes longer or shorter leaves. Follow the count and arrangement rather than forcing every ring to match the printed outline. The backing gives the center a place to attach without relying on six tiny tips meeting perfectly.
5. Make a mini botanical wreath
For the wreath, cut eight more 10 mm rings. Page 6 has a backing measuring 100 mm outside and 60 mm inside. Trace that ring onto scrap card; the thin printed sheet is a guide, rather than the final support.
- Cut out the outer circle. To reach the inner circle with scissors, make one slit across the ring, remove the center, then tape the slit closed on the back.
- Shape eight rings into leaves. Place them around the backing with their long sides following the circular direction. Adjust the overlap until the backing is mostly covered.
- Glue the bottom edges of the leaves to the card. Work around the circle, keeping the center open, and let it dry flat.
- Add the optional red paper berries from page 6 and a small ribbon bow. Tie a hanging thread through the backing or secure it firmly on the back.
Keep this small paper wreath indoors. If you paint the leaves sage green, use a light coat and wait until the rings are dry before gluing. Heavy wet paint can soften the cardboard and make the shapes harder to position.
6. Dress a napkin with a handwritten name
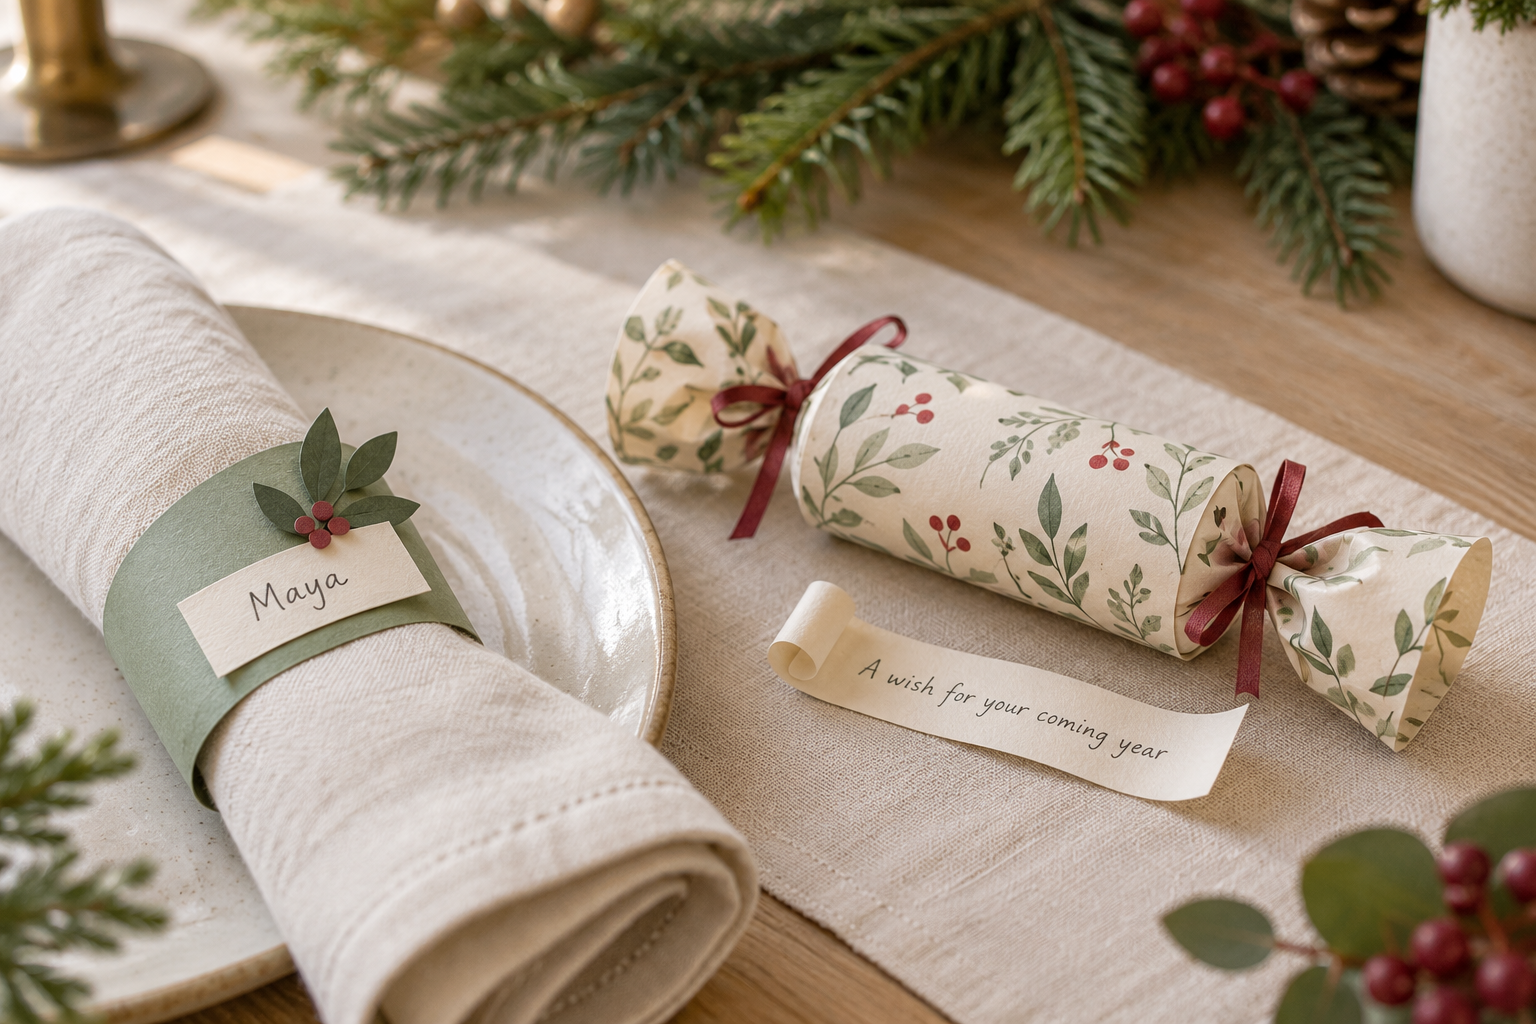
Use a fresh craft tube for this table project. Cut a 25 mm ring, a matching 25 mm paper band from page 4, and one name card and sprig from page 7. The three name cards measure 50 x 20 mm each.
- Trim the ring so both edges sit evenly. Cut the botanical band to its circumference plus 10 mm.
- Glue the band around the ring and keep the seam at the back. Write the name before adding the card.
- Glue the center of the name card to the front, allowing the ends to curve slightly. Attach one sprig at the side and hold the pieces until they grip.
- After the glue dries, slide a loosely rolled napkin through. If it feels tight, roll the napkin more narrowly or use a wider fresh craft tube with a band measured to fit.
The 35-45 mm tube range applies to the cottage and tree cones. A napkin ring can be wider because there is no fitted cone. Use one consistent paper and ink color across the table, and let the handwritten names provide the personal detail.
7. Wrap a little Christmas wish-note favor
This cracker-shaped favor holds a message. It has no snap; the recipient unties the ribbon to open it. The idea connects recycled Christmas crafts with the handwritten notes and small memories at the heart of SnipMeadow.
- Choose one of the four note strips on page 7 and write a short message. Roll it loosely so it fits inside the tube.
- For a 100 mm tube, cut thin wrapping paper 180 mm along the tube length. The other dimension is the tube circumference plus 15 mm. This leaves 40 mm of paper extending beyond each end.
- Center the tube on the wrapper, roll the paper around it and tape the overlapping seam. Insert the note.
- Gently gather one paper extension about 10 mm beyond the tube end and tie it with thread or ribbon. Repeat at the other end. Avoid stiff cardstock here: thin paper gathers more neatly.
Choose “A little moment I want to remember,” “A wish for your coming year,” “One thing I appreciate about you,” or the more open “A note for you.” The same sheet can be used for journal strips later. For more writing ideas, visit our Christmas journal prompts.
Download the free Christmas paper roll templates
Each PDF has seven pages: printing and measuring notes; cottage roof and facade pieces; tree canopy and star; two botanical paper panels; the six-petal ornament guide and backing; the wreath backing and berries; and four note strips, three name cards and three botanical accents. The sprig motif repeats to keep the collection coordinated.
Choose your paper format below. The files are free for personal use. When sharing the project, please link to this article rather than redistributing the PDFs.
Save the file before printing, check the scale and print only the pieces you need. The patterns provide paper components and arrangement guides; you supply the cardboard tubes, backing card, adhesive and ties. To make a village or a set of place settings, repeat the relevant sheets.
Questions and simple fixes
Can I use paper-towel tubes instead?
Yes, if their diameter fits the project and the cardboard bends cleanly. Cut them to the stated heights for the cottage and tree, or into equal rings for the ornaments. Thick shipping tubes are harder to cut and curve, so use lighter craft tubes for these projects.
Why is my roof or tree canopy loose?
Check that the canopy seam meets the dashed fold line, rather than overlapping far beyond it. Then check the tube diameter. The cone should rest against the rim before glue is added. Dry-fit first, keep the contact area clean, and leave the project upright until the adhesive sets.
Why are my wraps lifting at the seam?
Use enough overlap and spread the glue smoothly over the paper, including the seam edge. Let painted cardboard dry before wrapping it. A short piece of tape on the back can help hold the seam while the glue sets. Thick cardstock is less willing to curve around a small tube than ordinary paper.
Do I need a printer for these craft ideas?
No. Use your own paper and measure the bands, rings and backings from the instructions. A cottage roof starts as a 60 mm-radius half-circle with an extra glue tab; the tree canopy is a 120-degree sector of a 90 mm-radius circle, also with a tab. The printable removes the need to draw those curves and supplies matching decoration.
Can children help with these projects?
Children can decorate paper, choose colors and write notes with adult help. An adult should handle difficult cutting and scoring, and choose suitable supplies for the child. The miniature details and ring joins need patience; begin with a paper wrap or wish note rather than treating every project as a preschool activity.
How should I store the finished decorations?
Allow glue and paint to dry completely, then place the pieces in a shallow, dry box. Keep heavy objects off the cones and separate hanging threads so they do not tangle. These are light indoor paper decorations, so avoid damp windowsills and outdoor display.
For another cardboard-tube ornament technique, Ohoh Deco shows a cut-and-fold star tutorial with process photographs. It uses a different construction from the six-ring ornament here.
Make one small project first, then repeat the colors you like across the collection. A cottage, a paper tree and one handwritten favor can be enough for a quiet Christmas corner. For more seasonal printables and paper craft ideas, join Creative Notes through the signup form on SnipMeadow.


Looking for another little project? Explore Journaling, Printables or Paper Crafts.