
Free Printable Junk Journal Pocket Templates: 3 Easy Styles

These free junk journal pocket templates give your loose tags, short notes and tiny paper keepsakes a place to live. Choose a square classic pocket, a tall tag pocket or an open corner pocket, then print the three-page PDF in A4 or US Letter. Each design includes cut lines, fold lines and glue tabs, so you can spend less time measuring and more time arranging your page.
The soft sage, warm cream and dusty rose designs work together or on their own. Start with one pocket and a handwritten note; a page does not need lots of layers to feel special.
Free for personal use. No email signup needed. Print at 100% / Actual Size.
Table of Contents
Download your free junk journal pocket templates
These junk journal pocket templates include three designs, with one full-size pocket template per page. Choose the file that matches the paper in your printer. The finished pocket dimensions stay the same in both versions.
Included: three decorated pocket templates, labeled folding tabs, a one-inch scale-check square and short instructions on every sheet. Tags shown in the illustrations are styling examples and are not included in this pocket download. You can pair the pockets with our free botanical tags and journal cards.
Personal use only. Print copies for your own journals and personal gifts. Please share this article link rather than uploading, reselling or redistributing the PDF files.
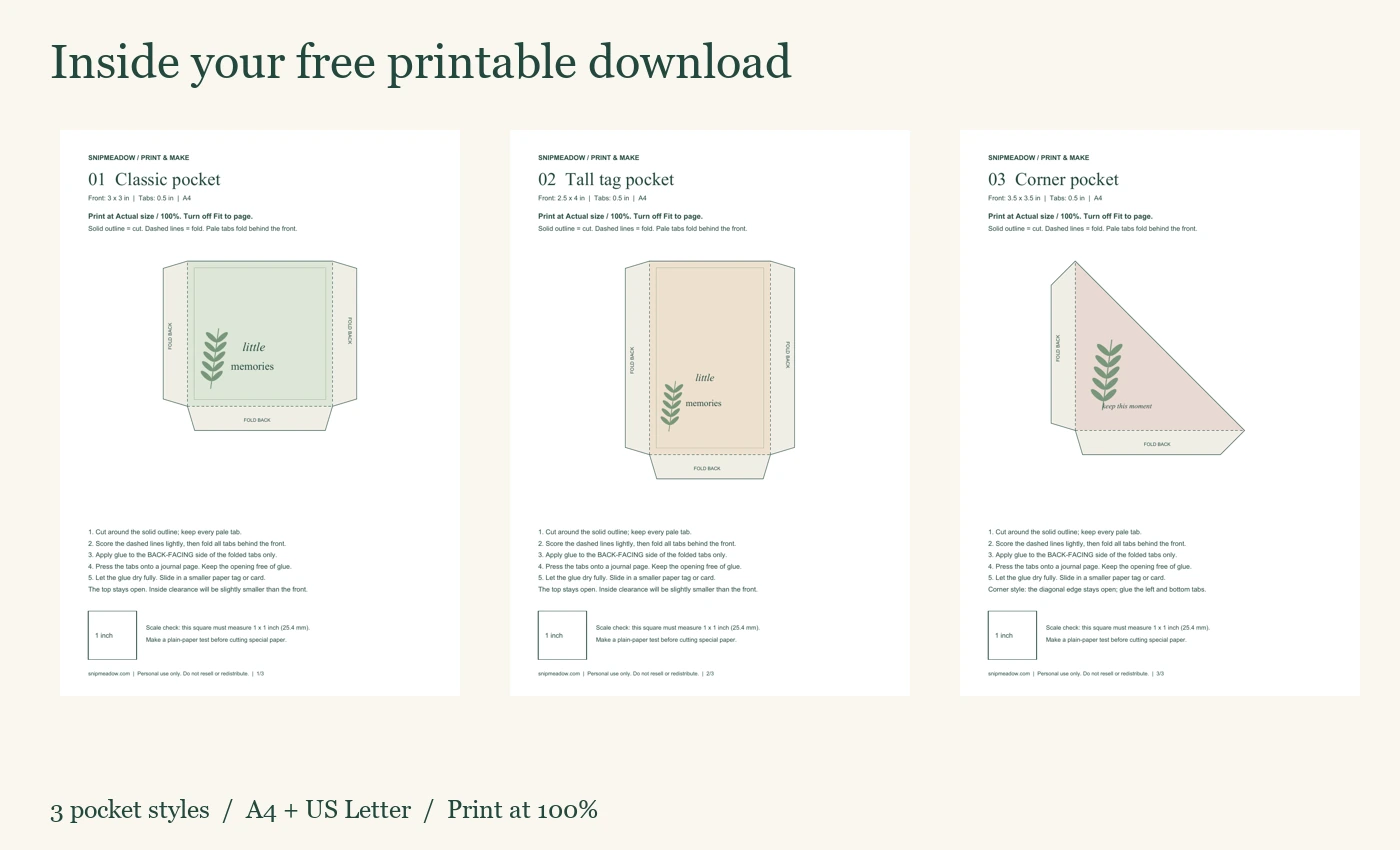
Three pocket styles and their sizes
1. Classic pocket — 3 × 3 inches. This square front gives you room for a small note, a ticket copy or a short tag. The left, right and bottom tabs fold behind the front, leaving the top open. The unassembled template fits within a 4 × 3.5-inch rectangle, including the tabs.
2. Tall tag pocket — 2.5 × 4 inches. Choose this narrower style for a longer journaling tag or a slim folded message. Its three tabs attach in the same way as the classic pocket. The flat template fits within a 3.5 × 4.5-inch rectangle. Leave a little of the tag showing above the opening so it is easy to remove.
3. Corner pocket — 3.5-inch straight sides. This triangular design has a left tab and a bottom tab. The diagonal edge remains open, making it a tuck spot for a paper card or photo copy. Its flat template fits within a 4 × 4-inch rectangle. The open diagonal holds a card differently from a closed-sided pocket; check the fit on your own journal page before gluing.
All tabs are 0.5 inch wide. These measurements describe the front shape, not guaranteed inside capacity. Paper thickness, folds and adhesive reduce the usable clearance slightly. Cut a scrap-paper insert first and make sure it slides freely.
What you need before you print
Gather your chosen PDF, a printer, matte paper, scissors, a ruler, a scoring tool or another blunt folding tool, and a small amount of paper glue or narrow double-sided tape. You also need a journal page and a tag or card to tuck inside. Use a cutting mat if you prefer a craft knife.
Try ordinary copy paper for the first fit check. For the final version, a slightly heavier matte paper can give the pocket more body without making the folds bulky. Check your printer’s paper-weight limits before using cardstock. Very thick card can crack at the folds and make the pocket difficult to close neatly.
Print your junk journal pocket templates at Actual size or 100%, with “Fit to page” turned off. Measure the square on the sheet: it should be exactly one inch, or 25.4 mm, on each side. If it is smaller, correct the print settings before cutting. Do not print the preview image as your template; use one of the PDF downloads above. If you use Acrobat, Adobe explains the options in its PDF page sizing guide.
How to assemble the junk journal pocket templates

Step 1: Cut the outer shape. Follow the solid outline, keeping every pale tab attached. The angled ends are intentional. Do not cut along the dashed lines: those mark the folds.
Step 2: Fold the tabs behind the front. Lightly score each dashed line, taking care not to slice through the paper. Fold the tabs toward the unprinted back and smooth the creases with a blunt tool. The classic and tall designs have three tabs; the corner design has two.
Step 3: Position the pocket on your page. Check how it looks with your planned insert and with the journal closed. Keep some space beside the binding so the pocket does not obstruct the page fold. If you are using fragile or irreplaceable paper, work with a copy instead.
Step 4: Glue the exposed backs of the folded tabs. With the tabs folded, turn the pocket over. Put adhesive only on the outward-facing tab surfaces that will touch the journal page. Leave the center unglued. Press the pocket onto the page; do not glue the top edge of the rectangular designs or the diagonal edge of the corner design.
Step 5: Let it dry and check the opening. Follow the drying time for your adhesive before sliding anything inside. If a tag catches, check for glue near the opening and trim the tag slightly rather than forcing it. These are flat paper pockets, intended for lightweight paper pieces rather than bulky objects.
For a separate beginner project you can make without printing a pattern, see how to make a simple journal tag pocket. That guide uses a smaller measured square; this download provides three ready-to-cut shapes.
If your page ripples: use less wet adhesive on the next pocket and keep it on the tabs. A thin layer is easier to control than a thick bead. Smooth the pocket gently without pressing glue into the opening. Let it dry with the journal open; closing a damp spread can transfer adhesive to the facing page.
If a folded edge cracks: try a lighter paper and score the fold gently before bending it. Fold a small offcut first to see how that paper behaves. Avoid repeatedly unfolding a finished tab, which can weaken the crease. You can also trace the shape onto a different paper rather than reprinting the decorative version.
If the corner pocket lifts: check that both tabs touch the journal page all the way along. A thick insert can pull them away from the page. Remove the insert, let the adhesive set fully, and try a thinner paper card. Leave the diagonal unglued so the opening remains usable.
Keep a reusable master: save the junk journal pocket templates with your other printable files and label the folder with the paper size. After a successful fit check, keep the scrap insert beside the pattern. It gives you a quick size reference when you make another pocket for the same journal. Write your preferred print percentage on the back of the test sheet, especially if you reduced the design.
Easy ways to use your new pockets
Use the classic pocket on a memory journal page with the date on the front and a few private sentences tucked inside. The tall pocket works as a home for a list of small things you want to remember: a favorite song, an unexpected kindness or a place you would like to revisit.
For a note you want to cover with a flap, try our free printable envelope template. Choose mini, journal or A2, and check the insert measurements before printing.
Try the corner pocket at the bottom of a page with a paper photo copy slipped under its diagonal. For a seasonal spread, add one of our botanical Christmas gift tags and write a holiday memory on the back. Keep decoration away from the opening so your insert can move.
Common printing and assembly questions
Can I use patterned paper instead? Yes. Print a template on plain paper, cut it out and trace its outline onto your own paper. Transfer the dashed fold positions too. Trace on the back so pencil marks do not show on the finished front.
Can I make the pockets smaller? You can reduce the print percentage, but the tabs and inside space will shrink too. At 80%, the classic front becomes 2.4 × 2.4 inches and each tab becomes 0.4 inch. Make a test with the intended insert before committing to decorative paper.
Why does my tag not fit? A tag as wide as the stated front will usually be too tight. Leave clearance at both sides and check that adhesive has not spread into the opening. Start with a smaller scrap insert, then use that as your sizing guide.
Are these photos of a finished project? The pocket illustrations show the design and construction; the sheet preview comes directly from the downloadable PDF. Printer settings and your paper choice affect the finished result, so make a plain-paper test before using special materials.
Save these junk journal pocket templates for your next quiet making session, or download one sheet now and start with a single note worth keeping.
Make room for your next little project
Get new journaling ideas, printable releases and simple paper projects in SnipMeadow Creative Notes.
Joining is optional. The free PDFs above are available without an email signup.


Looking for another little project? Explore Journaling, Printables or Paper Crafts.