
How to Use Botanical Stickers in a Junk Journal: 9 Easy Ideas

Botanical stickers can give a junk journal page a focal point without covering it in layers. A leafy stem can frame a sentence, a flower can connect two paper scraps, and a tiny sprig can make an ordinary label feel finished. The useful question is where to put each piece so the page still has room for your words.
These nine ideas show how to use botanical stickers in a junk journal with simple placement steps. Choose one arrangement for a page rather than trying all nine at once. Start with the stickers and paper you already have, and adjust the spacing to fit your notebook.
Table of Contents
Before using botanical stickers: supplies and placement
Gather a journal, botanical stickers, a pen, scissors, and a few plain paper scraps. Add paper-compatible glue only for the scraps or any nonadhesive cutouts you plan to use. A ruler is optional. Our beginner junk journal supplies guide explains the basic materials if you are starting from scratch.
Check the back of your decoration before using it. Adhesive stickers have a backing you peel away. A printed flower or leaf on ordinary paper is a paper cutout and needs glue; it does not become a sticker simply because it looks like one. Some clear stickers also have a nearly invisible backing, so check the packaging rather than adding glue immediately.
Arrange stickers with their backings still attached. Leave room near the binding, check that the journal closes, and write on loose cards before layering them. Clear designs usually read more clearly over plain, light paper; opaque designs can cover busy patterns. Test unfamiliar materials on a spare scrap, and do not assume a sticker can be repositioned after pressing it down.
Keep irreplaceable photographs and letters separate from these everyday craft pages, and use copies for collage. Botanical stickers are decorative supplies, not a guarantee of archival preservation. The National Archives guide to preserving scrapbooks explains how some adhesives can fail or stain paper over time.
1. Frame a writing corner
Use a tall leafy sticker to give a short entry a gentle starting point. Place it near the lower-left corner with its stem following the side margin and its leaves pointing toward the writing area. Keep the whole sticker inside the page so delicate tips will not catch when you turn it.
Before peeling, lay a small blank card beside the leaves to stand in for your writing space. Move the sticker outward if the leaves crowd the card. Attach the sticker, then write the date and a few sentences beside it. One stem is enough; leaving the opposite corner open keeps the page from feeling boxed in.
2. Make a broken botanical border
A border does not need to run around all four edges. Choose three small sprigs and arrange them along the outer margin, with visible gaps between them. Point the stems in the same general direction so the pieces feel connected without forming a solid strip.
Start by positioning the middle sticker, then space the others above and below it. Leave the inner margin clear and keep the leaves away from your handwriting. Once the spacing looks comfortable, attach each piece separately. This works well beside a longer entry because the decoration stays at the edge instead of interrupting each line.
3. Nestle a flower beside a date label
Cut a small rectangle from plain paper and write the date or a short heading on it. Set the label near the top of your page. Position one flower sticker behind a corner so the flower head remains visible and the stem appears to tuck under the label.
Decide on the overlap while the sticker backing is still on. Attach the flower first, then glue the paper label over the intended portion. Keep the words clear of petals and patterned areas. For an even simpler version, place the flower entirely beside the label; you still get a connected heading without hiding any of the design.
4. Decorate a pocket without sealing it
A botanical sticker can dress up a plain pocket while leaving the insert easy to remove. Choose a sticker smaller than the pocket front and set it toward one lower corner. Keep every part below the opening rather than letting a leaf bridge the pocket and the journal page.
Decorate the flat pocket front before assembly when possible. Then fold and attach the pocket according to its instructions, allow any glue to dry, and slide in a scrap-paper insert to check the fit. Our three printable junk journal pocket templates offer different pocket shapes if you need a starting point. A sticker decorates the pocket; it does not replace the adhesive holding the folded tabs.
5. Build a small botanical specimen panel
Give one detailed sticker its own plain paper panel. Cut a rectangle with enough space for the plant and a short caption underneath. Position the sticker slightly above the center, leaving the lower section blank. A cream or pale-colored background can help fine stems stand out.
Attach the sticker to the loose panel, write a caption, and glue the panel into the journal. You might use “leaves after rain” or a date and place that means something to you. If you cannot identify the illustrated plant, use a descriptive caption rather than guessing its species. Keep the surrounding page simple so the small illustration remains the focus.
6. Connect two paper scraps
Use a sticker as a visual link between two background papers. Lay a narrow patterned scrap beside a wider plain piece, overlapping their edges slightly. Position a leafy branch across the join, with part of the design on each paper.
Glue the background scraps first and let them dry flat. Then apply the sticker over the join, smoothing gently from the center outward. Avoid a thick ridge underneath a delicate sticker because it can keep the adhesive from making even contact. Leave a separate plain area for writing. The branch ties the papers together visually, while the glue underneath does the work of securing them.
7. Turn a paper strip into a floral divider
A narrow divider can separate two entries on the same page. Cut a thin strip of plain paper to fit within your margins. Place two or three tiny flowers along the strip, leaving space between them, and keep their edges within the paper.
Write the upper entry first so you know where the divider belongs. Attach the decorated strip underneath, leaving a small gap above and below it, then begin the second entry. If the page already has enough layers, skip the strip and arrange the stickers in a short horizontal line directly on the page. Keep the line shorter than the full page width for a lighter finish.
8. Add a botanical accent to a removable card
Decorate a loose writing card instead of adding another layer to the journal page itself. Position a small sprig in the upper-right corner, leaving the center and lower area free for a note. Write while the card is flat, then attach the sticker away from the words.
Slip the card into a pocket and check that the decorated corner does not snag. Keep the sticker completely on the card rather than wrapping it around an edge. SnipMeadow’s botanical tags and journal cards are an optional paper starting point. Those printable pieces are not adhesive stickers; cut them out and use them as cards, or add glue when attaching them permanently.
9. Create a botanical title wreath
Arrange several small leaves in an open oval around a short title such as “October notes.” Write the title first on a plain paper panel. With the backings still attached, set two curved sprigs below it and smaller leaves around the sides, leaving the top partly open.
Check that no leaf touches the lettering, then attach the pieces one at a time. Work from the larger sprigs to the smaller accents so you can stop when the frame feels complete. Glue the finished panel onto your page. An open wreath needs fewer stickers than a dense circle and gives the heading room to breathe.
Download botanical cutouts for these ideas
Want a matching set to work with? This free SnipMeadow pack contains 26 cutouts across two pages: nine botanical motifs, two border strips, three specimen panels, six write-in labels, three tags, and three word labels. Use the motifs for corners and clusters, or pair a label with a small sprig.
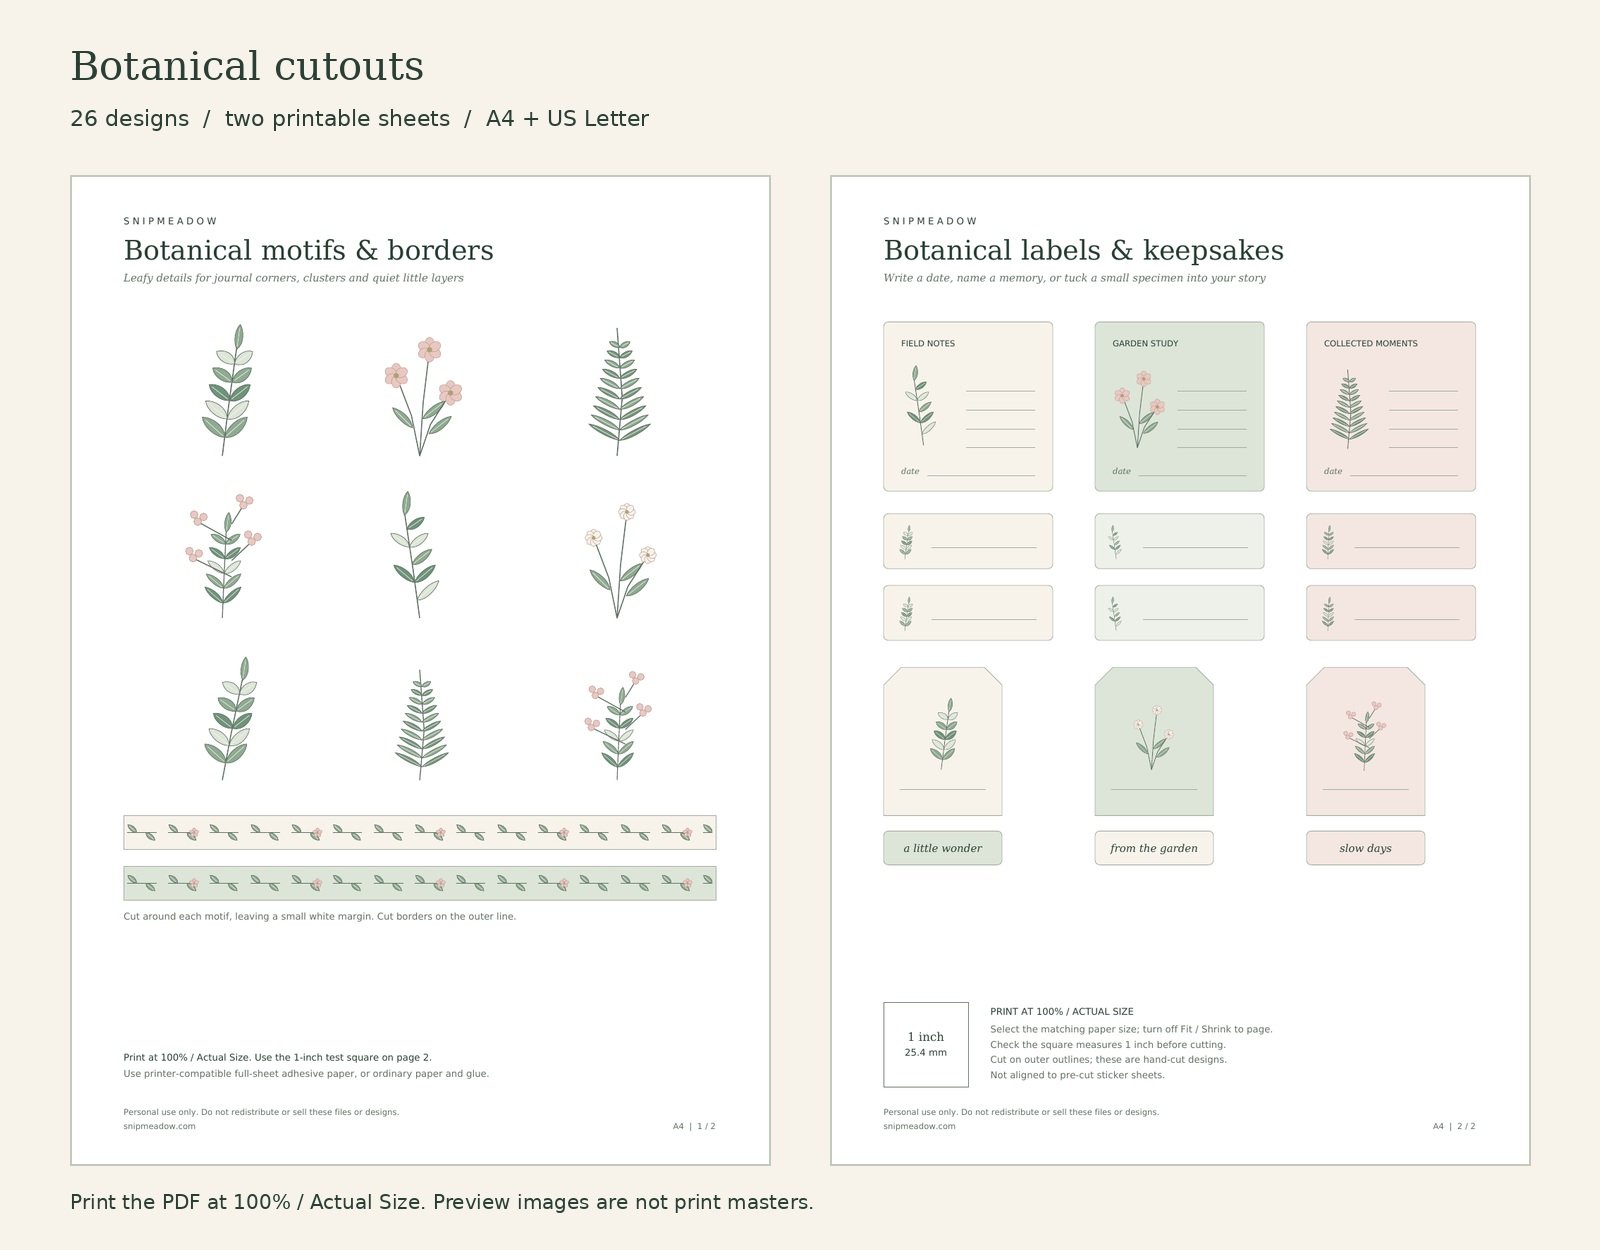
Use the PDF that matches the paper in your printer. Select 100% or Actual Size, turn off Fit or Shrink, and print one test sheet first. Measure the one-inch check on page two before cutting. The artwork keeps the same physical dimensions in each paper-size version.
For botanical stickers, choose full-sheet adhesive paper compatible with your printer, then cut out the designs by hand. These files are not aligned to pre-cut sticker sheets. Ordinary paper works too: cut out the pieces and add paper-compatible glue when attaching them. Leave a small white margin around delicate motifs and cut borders along their outside lines.
Personal use only. Please do not redistribute or resell the files or designs. Share this article’s link so others can download their own copy.
Common mistakes with botanical stickers
Peeling too early: arrange backed stickers first. If an attached sticker resists lifting, avoid pulling hard on thin journal paper; adjust the surrounding layout instead.
Covering useful space: mark out the writing area before decorating. Keep stickers away from pocket openings, hinges, and page folds so the moving parts still work.
Using too many layers: close the journal gently after planning a spread. Distribute thicker panels across different pages rather than stacking every accent in the same corner.
Writing on an unfamiliar coating: ink can smudge on smooth sticker surfaces. Write beside the sticker or test your pen on an unused scrap of the same material first.
Start with one sticker and one sentence
Choose a corner, label, or card, and give one botanical sticker a clear place on it. Add a date or a sentence worth keeping. Once the page feels balanced and remains easy to use, you can stop: the open space is part of the design.


Looking for another little project? Explore Journaling, Printables or Paper Crafts.