
Book Doodle: 7 Easy Ideas for Your Reading Journal

A book doodle can be as simple as a rectangle with a narrow line down one side. Add a little label, a bookmark or a flower, and you have a small drawing for a reading journal, a handwritten note or the corner of a book review.
This guide gives you seven easy book drawings, each with three illustrated stages. Start with the closed book, then try an open book, a small stack and a tiny bookshelf. The free practice sheets include the same drawing steps, blank spaces for your own attempts and a simple reading-journal layout.
Quick start: draw a tall rectangle, add a vertical line just inside the left edge for the spine, then put a small label on the cover. That is your first book. You can stop there or use one of the variations below.
Download US Letter book doodle practice sheets
Download A4 book doodle practice sheets
Table of Contents
What you need for a simple book doodle
- A pencil and a small piece of scrap paper.
- An eraser and a pen you enjoy writing with.
- Your journal, a blank card or the printable practice sheets.
- Optional: colored pencils, a ruler and a small piece of paper to protect the next journal page.
Use what you already have. A pencil lets you adjust the outline before adding ink, and a ruler can help with the first rectangle. Once the shape feels familiar, try drawing it freehand. Slightly uneven edges are fine in a small journal decoration.
Try your pen on a spare piece of the same paper before drawing in your journal. Let the ink dry, then test a little color beside it. This quick check helps you see whether your particular pen smears or shows through. Our beginner journal supplies guide has more ideas for keeping your paper-craft setup simple.
7 book doodle ideas, step by step
Read each diagram from left to right. The last stage includes optional color; you can leave every design as line art. Draw your first attempt a little larger than the version you want in your journal so you have room to see how the parts fit together.

1. Closed book: the easiest place to start

- Draw a rectangle that is a little taller than it is wide. Keep the top and bottom edges roughly parallel.
- Draw one vertical line just inside the left edge. The narrow strip becomes the spine, and the wider section becomes the front cover.
- Add a small rectangular label on the cover. Draw two short marks inside the label and a short band near each end of the spine.
This is a flat, front-view book icon. It does not need perspective or shading. Keep the label blank if you want to add an initial later. A sage cover with a cream label works well beside a reading list, but one pen is enough.
Try drawing three copies in a row. Change only the height or width, keeping the spine in the same position. You will get a family of little books without learning a new shape.
2. Open book: two pages and a center fold
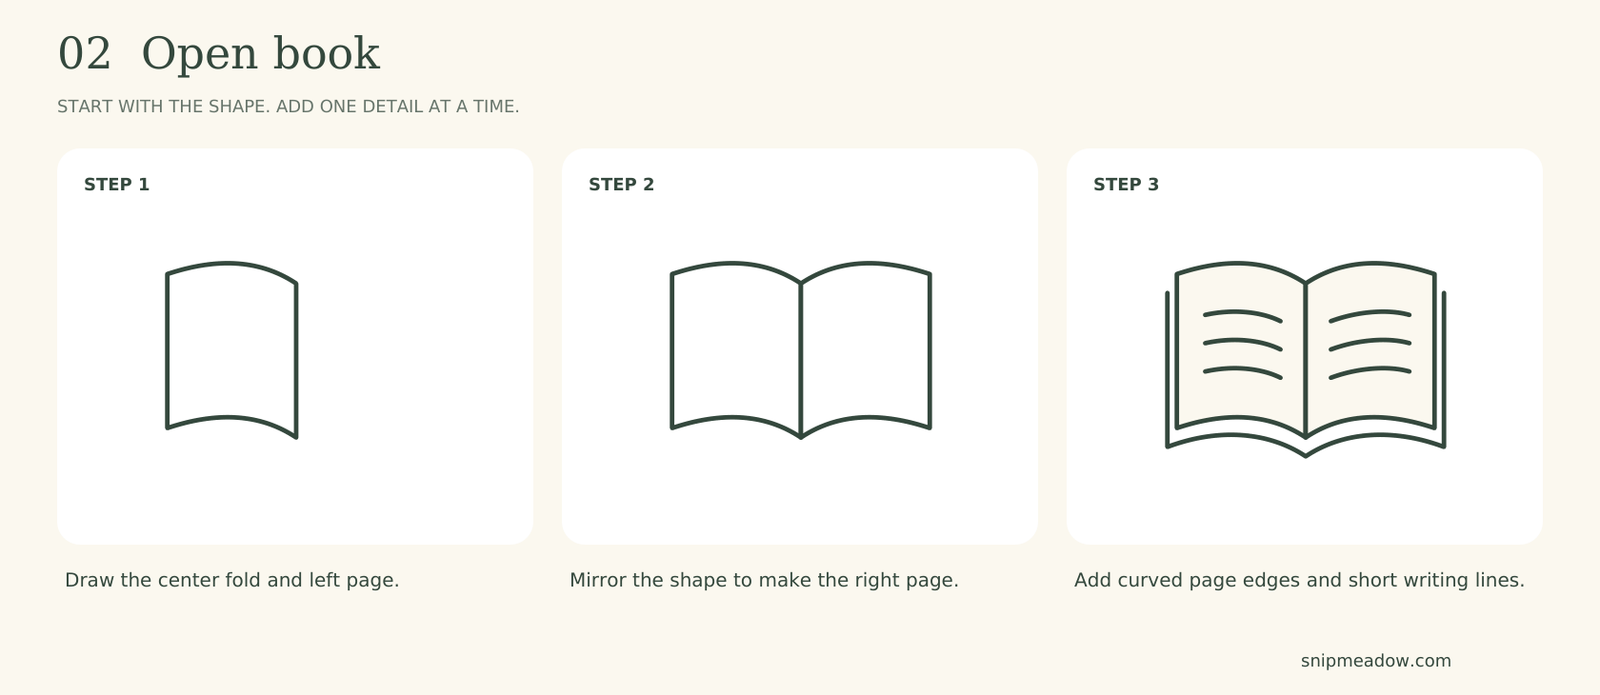
- Draw a short vertical center line. To its left, add a second vertical edge, then join their tops and bottoms with gentle curves to form the left page.
- Repeat the page shape on the right. Let both pages meet at the original center line. The sides can be a little uneven.
- Add a second curved edge below the pages and short outer side lines for thickness. Finish with two or three short curved writing lines on each page.
Leave a narrow gap between the writing lines and the center fold. A drawing this small only needs a suggestion of text. Do not try to squeeze a real paragraph onto the pages.
Use the open book beside a quotation, a reading reflection or a short note about a chapter. If it looks crowded, remove the writing marks and keep just the outline and fold.
3. Stack of books: repeat one simple shape
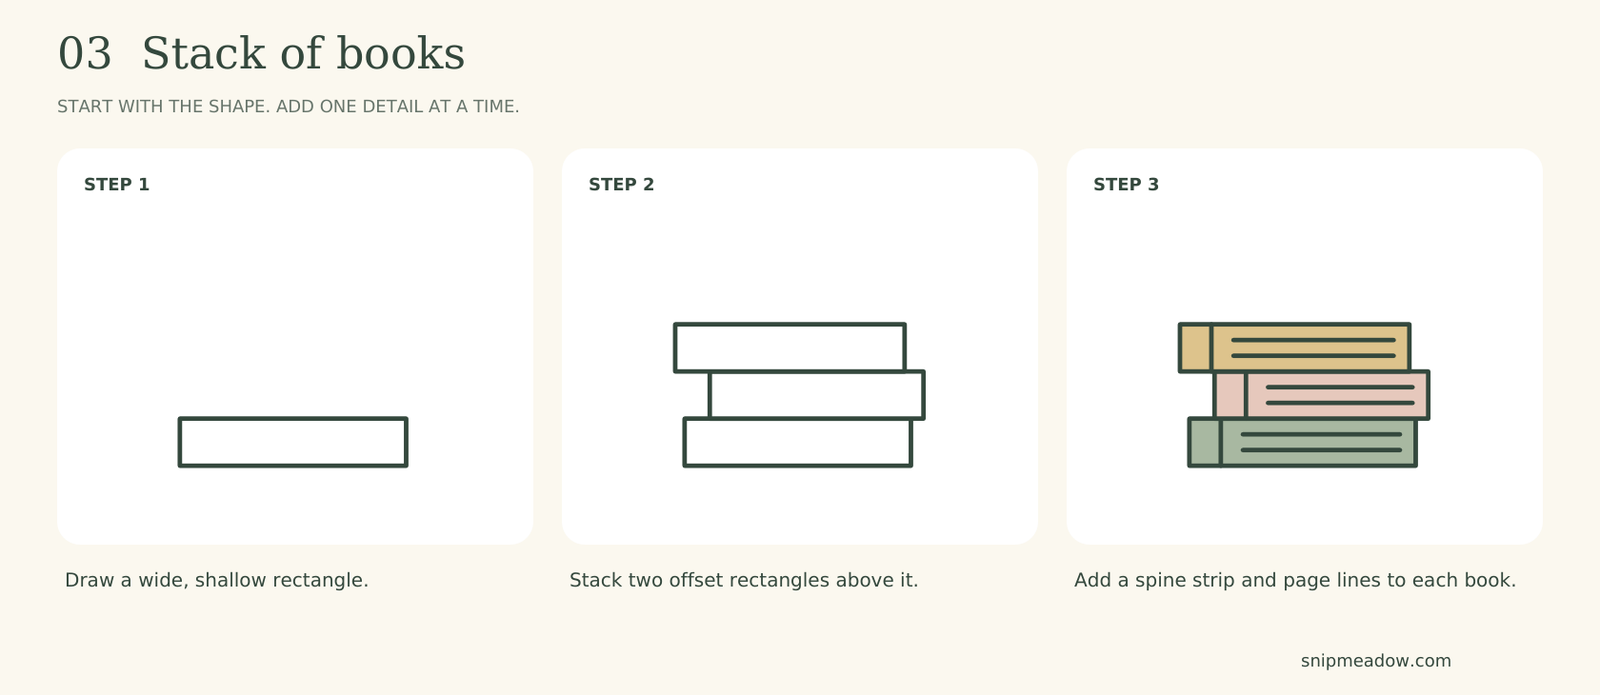
- Draw a wide, shallow rectangle for the bottom book.
- Add two more shallow rectangles directly above it. Shift the middle one slightly right and the top one slightly left, keeping the books touching.
- Give each rectangle a narrow spine strip at the left. Add two horizontal lines to the wider section to suggest the edges of the pages.
This is a simplified side-view stack. Make the offsets small so the books still look balanced. You do not need a different perspective angle for every layer.
A stack is useful beside a monthly reading total. Change the cover colors, or leave all three outlines plain and color one after finishing a book. Keep a written count nearby if the stack is only decorative.
4. Book with a bookmark: a tiny detail that changes the look
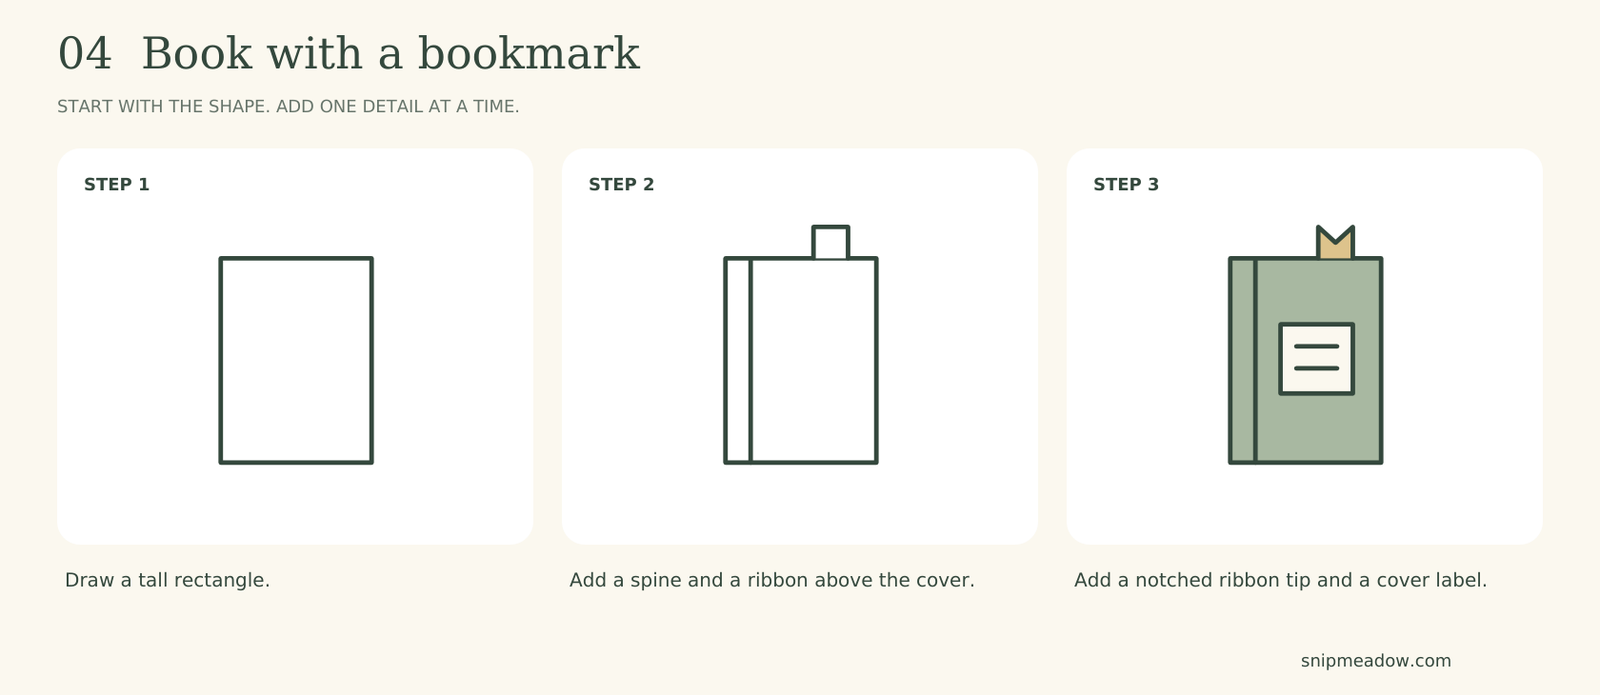
- Draw the same tall rectangle used for the closed book.
- Add the spine line and a small rectangular bookmark tab sticking above the top edge. Keep the tab narrower than the cover.
- Give the exposed tip a shallow V-shaped notch, then add a small label on the cover. If you drew the flat tip in pencil, erase it before inking the notch.
The bookmark disappears behind the cover, so its outline stops at the top of the book. You do not need to draw the hidden part through the cover.
Place this version beside a “currently reading” heading. A gold or blush bookmark adds a small accent without filling the whole drawing with color.
5. Tiny bookshelf: a reading-tracker accent
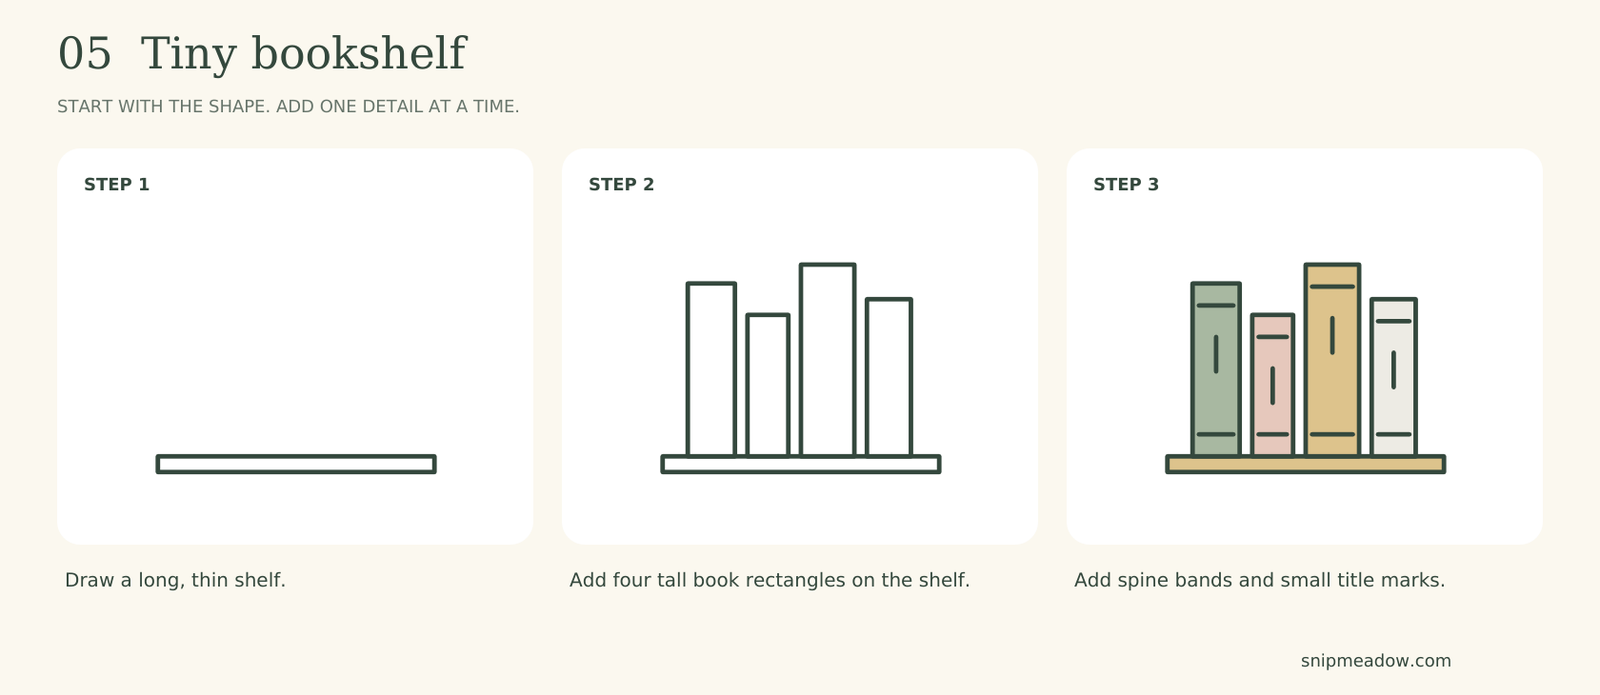
- Draw a long, thin rectangle for the shelf.
- Stand four narrow rectangles on its top edge. Vary their heights and widths while keeping their bottom edges on the shelf.
- Add a short horizontal band near the top and bottom of each spine. Put one small title mark in the middle of each book.
Leave a little air between the books. If the spines are very narrow, skip the title marks and use color to separate them instead.
For a small tracker, let each spine represent one book and write a matching numbered list underneath. You can also use the shelf purely as decoration above a reading log. Decide which job it has before adding labels.
6. Floral cover: a botanical book doodle
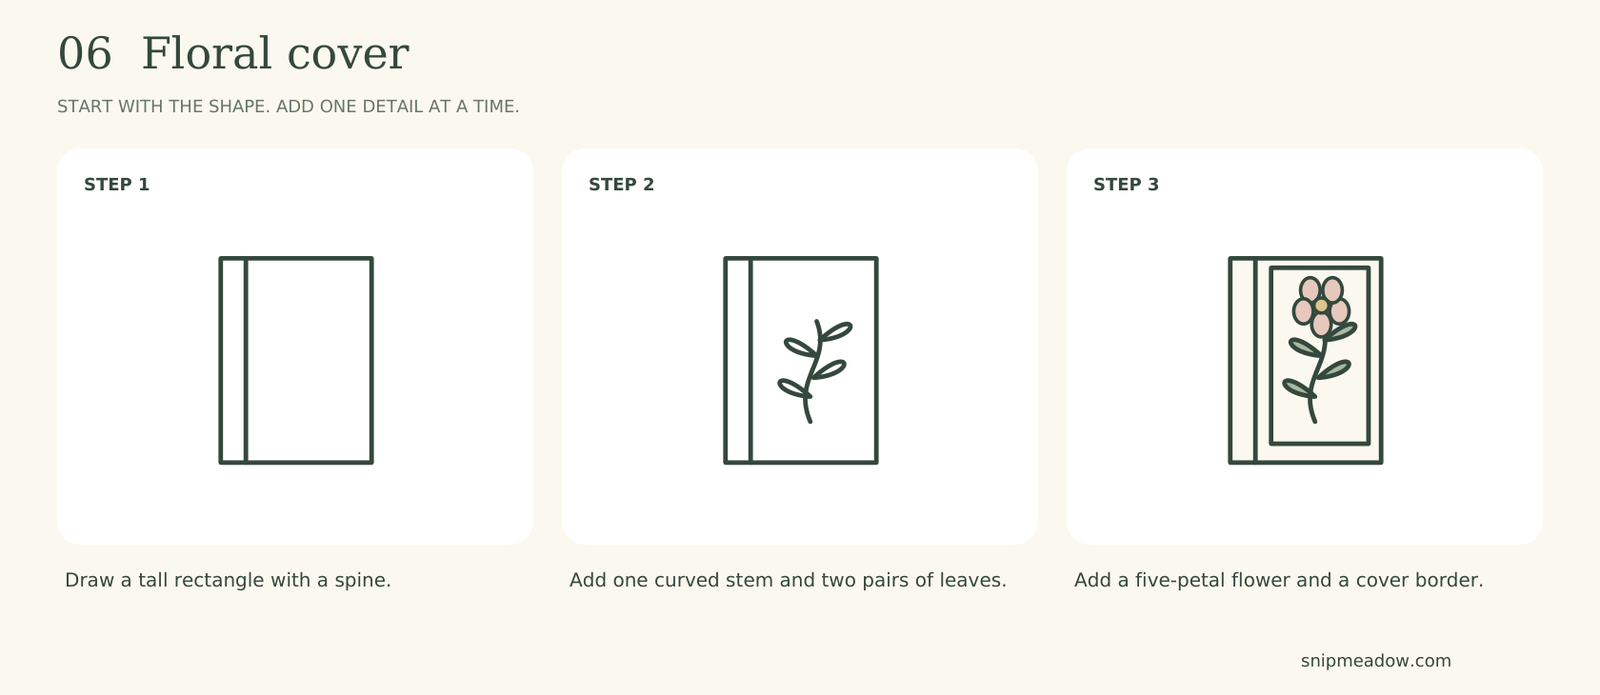
- Draw a tall rectangle and its narrow spine strip.
- Add one gently curved stem in the middle of the cover. Draw two pairs of small leaves, with each leaf meeting the stem.
- Add a small flower with five rounded petals at the top. Finish with a thin border inside the cover, leaving space around the petals and leaves.
Keep the flower smaller than the cover label in the first design. The border should frame the sprig without crossing it. If the drawing is tiny, leave out the border and use just the stem, two leaves and a flower.
This variation fits a nature-reading page or a botanical journal theme. For ideas about placing greenery around writing, see our botanical journal corner ideas.
7. Book with a heart: mark a favorite read

- Draw the closed-book outline and its spine strip.
- Add a small heart in the center of the cover. Start with two rounded humps and bring the sides together at one lower point.
- Frame the heart with a thin rectangular border. Add two short spine bands, then leave the background plain or color the cover softly.
Keep some empty space between the heart and the border. If your heart looks uneven, make its two top curves a little wider before changing the rest of the book.
Use this book beside a favorite passage or a recommendation you want to remember. If you already have a rating system, keep the heart as a decoration or explain what it means so it does not conflict with your stars.
Use your book drawings in a reading journal
A doodle works best when you know what space it belongs in. Write your heading and main notes first, or mark their positions lightly with pencil. Then choose one book shape that fits the space left over.
- Currently reading: place the bookmark book beside the title and start date.
- Monthly reading log: use a small stack near the heading, with your actual book list underneath.
- Favorite quotation: put an open book beneath a short quotation and add the author or page reference in your own writing.
- Books to remember: add the heart-cover design beside a recommendation, then write why you want to read it.
- Journal card: draw one floral cover on a small paper scrap and leave the rest of the card for a note.
For an easy starting layout, use our free reading journal printable. Add one small book near a heading and keep the main writing boxes clear. You can also tuck a decorated reading note into a printable journal pocket after trimming it to fit.
Keep small book doodles clear
Use fewer details as the drawing gets smaller. On a tiny cover, one heart or one short title line is enough. Thick outlines, several borders and lots of writing can merge together when the drawing is reduced.
Choose one visual system. You might use sage for books you have finished, blush for books in progress and an uncolored outline for books you plan to read. Write a small key once if the colors carry meaning. If they are just decoration, choose whichever palette you enjoy.
Fix the outline before adding more detail. If a closed book looks like a door, make the cover a little wider and shorten the label. If the open book looks like two boxes, soften the top and bottom curves. If the stack looks as though it is floating, bring the rectangles together so their edges touch.
Practice one design three times: once by looking at the diagram, once with fewer details and once at the size you need. Keep the version that reads clearly next to your handwriting. The goal is a useful little page accent, so there is no need to make every line identical.
Download the free book doodle practice sheets
Choose the PDF that matches the paper in your printer. Both formats contain three pages with the same seven designs. These are drawing practice sheets, with line-art examples and blank practice spaces; the colored illustrations shown in the article are not printed as full-color backgrounds.
| Page | Included practice |
|---|---|
| 1 | Closed book, open book and stack of books. |
| 2 | Book with a bookmark, tiny bookshelf and floral cover. |
| 3 | Book with a heart, plus a reading-journal layout to decorate. |
Download US Letter book doodle practice sheets
Download A4 book doodle practice sheets
- Open the file in a PDF viewer and choose portrait orientation.
- Select A4 paper for the A4 file or 8.5 × 11 inch paper for the US Letter file.
- Start with 100% / Actual Size and check the print preview. Print one page first.
- Use black-and-white or grayscale mode if you want a plain practice copy. Print only the pages you need.
These sheets do not contain measured cutting patterns, so a small reduction will not spoil the exercise. If your printer clips an edge, check that the paper sizes match, then use Fit if needed. Adobe explains the difference between these settings in its PDF page-sizing guide.
Personal use only. You may print the sheets for your own practice. Please share the article link rather than uploading, selling or redistributing the PDF files.
Book doodle questions
What is the easiest book doodle for a beginner?
Start with the closed book: one tall rectangle, one narrow spine strip and a small cover label. Leave out color and decorative details until you are comfortable repeating the outline.
How do I draw a tiny open book?
Draw a center fold and two page shapes that meet along it. Curve the top and bottom edges gently, then add just one or two short writing marks on each side. Skip the extra page thickness if the icon is very small.
Do I need special pens or drawing paper?
No. Begin with a pencil and scrap paper. A familiar writing pen is enough for the outline. Test your ink and coloring materials on the paper you plan to use before drawing on a finished journal page.
Are these printable bookmarks or book-cover templates?
No. The PDFs are drawing practice worksheets. The little bookmark is part of one book drawing; it is not a full-size bookmark cutting template.
Can I use these ideas in a junk journal?
Yes. Draw a small book on a journal card, reading note or paper scrap, or add one beside a heading. Leave room for the writing and check that any separate card fits its pocket before decorating it.
Can I print only one practice page?
Yes. Use the page selector in your print dialog. Page 1 covers the three basic book shapes; page 2 has the bookmark, shelf and floral cover; page 3 has the heart cover and a reading-journal practice area.
Choose the closed book or open book for your first attempt, then add it to one reading note. Once that outline feels easy, use a small change in color, cover decoration or size to make the next one your own.


Looking for another little project? Explore Journaling, Printables or Paper Crafts.