
Botanical Junk Journal Ideas: 6 Prompts, 3 Layouts & Cozy Details
A botanical junk journal can begin with one green scrap and a sentence about your day. These botanical junk journal ideas give you six creative prompts, three layouts to reuse, and small woodland and November details you can make from ordinary paper. Choose one starting point rather than trying to fit every idea onto the same page.
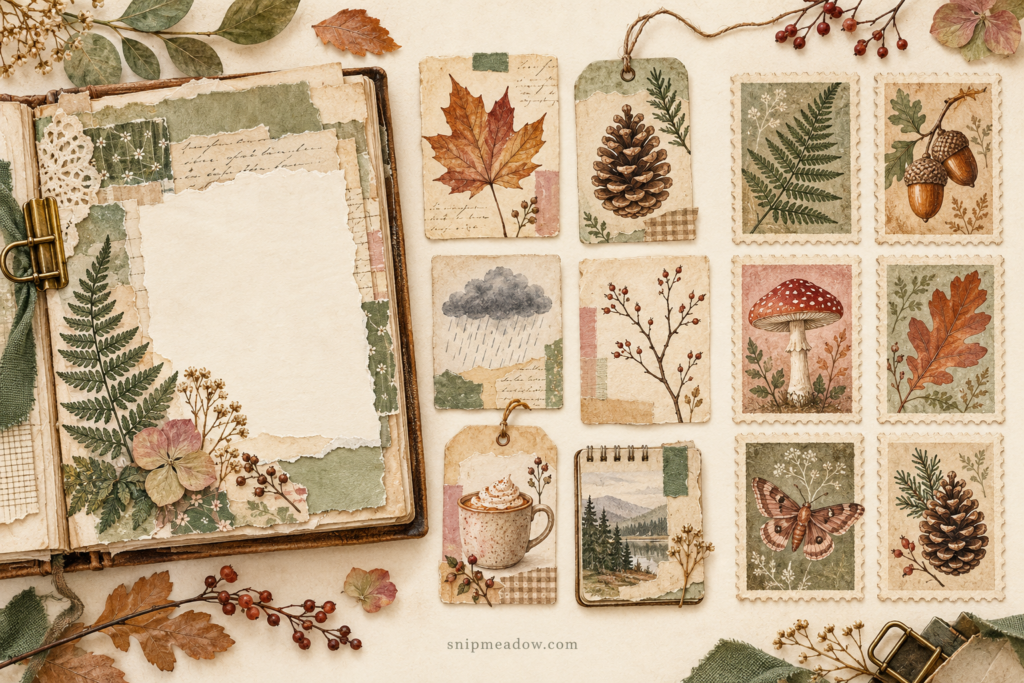
If you arrived from our Botanical Prompts, Botanical Layouts, November Field Notes or Woodland Faux Stamps pin, the matching section is linked below. The free botanical junk journal ideas guide includes the six prompts, three layout diagrams and six writing cards. The decorative ephemera in the hero illustration are inspiration examples, not cutouts included in the guide.
Get the free botanical junk journal ideas guide, or start with the papers already in your scrap box.
Table of Contents
A small kit for these botanical junk journal ideas
Gather a notebook or loose sheet, a few thin paper scraps, scissors, a pencil, a pen and a paper glue stick. Sage wrapping paper, a clean brown paper bag, cream copy paper and a little printed pattern are enough. A ruler is useful for a pocket, but most decorative edges can stay irregular.
Choose a light paper, a medium green and one darker accent. A small touch of rust, blush or mustard can make the leaves stand out. Keep the writing area on plain paper so your words remain easy to read. You can use your own drawings or a few free botanical tags and journal cards as accents.
Try the arrangement without glue first. Leave space beside the binding, keep thick layers away from the fold, and close the journal gently before committing. If you are starting from scratch, our beginner junk journal guide explains the basic setup. The illustrations here show possible arrangements; they are not photographs of projects we have physically assembled and tested.
Six botanical junk journal ideas for a blank page
These prompts match the six ideas on our “A blank page? Start here” pin. Each gives you a small making task and something to write. Pick the one that fits the scraps in front of you; there is no required order.
1. Build a page around one shade of green
Find three scraps that belong to the same green family. They do not need to match exactly: pale sage, olive and deep forest green give the page contrast. Tear the largest piece into a background patch, place the medium scrap partly over it, and reserve the darkest piece for a small leaf or narrow strip.
Add a plain writing card beside the cluster rather than covering it with more pattern. Write one sentence beginning, “Today I noticed this color in…” A plant outside a window, a favorite mug or a market awning can all be starting points. If the page feels flat, change one paper’s lightness before adding more decorations.
2. Draw a leaf you noticed today
Use a leaf you can observe, a photo you took, or a simple remembered shape. Draw the outside edge first, then a central vein and a few side veins. A slightly uneven outline is fine. The aim is to record what caught your attention, not to make a botanical identification sheet.
Draw on a separate cream rectangle if your notebook paper is thin. Add the date and one detail: “glossy after the rain” or “small leaves beside the gate.” Mount the rectangle on a narrow colored backing and leave the rest of the page open. A paper leaf works too if you would rather cut than draw.
3. Make a tiny garden from paper scraps
Tear two short strips for the ground and overlap them near the bottom of a card. Cut three slender stems, then add flower heads from circles, rounded petals or scraps with a floral pattern. Vary the heights so the garden has movement. Put the stems behind the flowers before gluing.
Use only two or three flowers on a small card. Write underneath, “Something I would like to grow more of is…” Your answer can be a plant, a habit or time for a favorite activity. If every paper is patterned, replace one with a plain scrap to help the little flowers read clearly.
4. Save a seed packet and add a memory
Flatten an empty packet, use a copy, or make your own packet-shaped rectangle. You do not need actual seeds. A handmade label with a flower name or the words “things to grow” gives the page the same collected feeling. Keep any loose contents out of the journal.
Place the packet beside a writing card, or use its front as a decorative panel on a flat pocket. Write about something you planted, a garden you remember or a plan you are looking forward to. If the paper is bulky, use only a copy of the front and leave the original separate.
5. Pair one flower with one sentence
Choose a single flower sketch or paper flower. Place it near one corner of a plain card and write a short sentence on the clear side. A small title is optional. This is a useful botanical junk journal idea when you want to make a page without spending the evening collecting supplies.
Try “The best ordinary part of today was…” or describe a sound from your morning. Use the flower as a companion to the words. If you need a simple drawing to begin, follow our six-step daisy tutorial on a separate scrap before adding it to your journal.
6. Create a border from torn paper leaves
Tear small pointed ovals from two different papers. Arrange them along one side of the page, turning alternate leaves slightly inward and outward. Keep a few gaps between them so the border feels light. A pencil line underneath can help you place them, but it does not need to remain visible.
Glue from the bottom of the arrangement upward, overlapping only a little. Keep the center of the page for writing. Ask, “What small details surround this memory?” This border works on a full page, a loose card or the edge of a pocket. Reduce the number of leaves before reducing the writing space.
Three botanical junk journal layouts to try
A prompt gives you an idea; a layout gives the pieces somewhere to go. These three arrangements match our Botanical Layouts pin and work with any of the six prompts above. The printable guide includes simplified diagrams you can keep beside your supplies.
Layout 1: a corner cluster
Overlap two thin scraps in the lower-left or upper-right corner. Use different sizes so both remain visible. Add one fern, leaf or flower across the join, and position a short label partly on the background and partly on the plain page. Leave most of the page clear.
This arrangement suits the one-color prompt or the flower-and-sentence prompt. Keep the cluster on the outer side if your binding is tight. Before gluing, look at the page from a little farther away: one recognizable botanical shape should stand out from the smaller textures.
Layout 2: a leafy side border
Place a narrow torn strip beside one edge. Add a second, shorter strip or a few leaf shapes over it. Vary the ends rather than trimming everything into one hard rectangle. Write on the open side, leaving a visible gap between the border and your words.
Use this layout for a longer memory or a list of things you noticed outdoors. If the page feels heavy on one side, add a tiny date label near the opposite corner. You do not need to build a second large cluster to make the arrangement feel complete.
Layout 3: a simple pocket page
Choose the writing card first, then make a flat pocket wide enough for it to slide in without catching. Position the pocket in the lower half of the page. Apply adhesive along the left, right and bottom edges only, leaving the top open. Keep the adhesive band narrow enough that it does not steal the space intended for the insert.
Let the pocket dry before trying the card. Decorate the front with a small leaf and one word; leave the top of the insert visible. For measured shapes and folding instructions, use our free junk journal pocket templates. The layout diagram in this guide is a reference, not a full-size pocket pattern.
November Field Notes: six cozy ephemera ideas
The November Field Notes pin combines six small motifs. You can use the same collection as a seasonal theme, or take only one element for an everyday page. November weather and plants vary by location; use what the month actually looks and feels like where you live.
- Leaf specimen card: place a drawn or paper leaf on a cream rectangle. Add the date and a short observation below. A plain border makes it feel like a collected field note.
- Pinecone sketch: draw a loose oval and fill it with overlapping curved marks. Mount the sketch on brown paper. The repeated marks suggest the cone without requiring every scale to be exact.
- Rain-cloud label: cut a soft cloud shape from gray-blue paper and add a few short rain lines. Leave a small space for a word about the weather or your mood.
- Bare branch: draw one main line with a few smaller offshoots. Place it across a narrow card or beside the date. A single branch can balance a busier floral scrap.
- Warm mug tag: cut a simple cup shape and add a handle with a pen. Use a thin strip for a saucer and two or three curved lines for steam. Write about a pause you enjoyed.
- Tiny field notebook: fold a small paper rectangle in half, add a colored cover panel and write “field notes” on the front. Keep it flat, or draw the notebook as a motif if your journal already feels full.
Connect the pieces with one repeated color or label style. Six motifs do not mean six layers on every page. A leaf specimen on one spread and a mug tag on the next can carry the theme without making the book bulky. The hero illustration shows an artistic interpretation of these ideas; the downloadable guide contains prompts, layouts and writing cards.
Six woodland faux-stamp motifs
Faux stamps are small decorative rectangles that borrow the framed look of postage. They are paper embellishments, not valid postage. For a simple version, cut six small rectangles, draw a thin inner border, and put one motif in each. Straight edges are fine; a drawn dotted edge can suggest perforations.
Use fern, acorn, mushroom, oak leaf, moth and pinecone as your six subjects, matching the Woodland Faux Stamps pin. Keep the drawings simple enough to recognize at a small size. For a fern, repeat little leaves along a stem. For an acorn, combine an oval with a rounded cap. A mushroom needs a stem and a curved cap; a moth can be made from two paired wing shapes around a narrow body.
Repeat the same background and border treatment to make the set feel related. Vary the main accent: green for the fern, warm brown for the acorn, rust for the mushroom and muted blush for the moth. Add your own short label underneath if there is room, rather than shrinking the lettering to fit a long name.
Use one faux stamp on a corner cluster, a pair beside a field-note card, or three down a narrow border. Leave a clear margin around each miniature image. If you enjoy a collected-page look, combine a stamp with a handwritten date or a small paper label; you do not need to copy a real postal design.
How to use these botanical junk journal ideas
- Choose the story. For example, record a quiet walk and the green leaves you noticed. Write the sentence on a loose card while the surface is still flat.
- Choose a layout. Try a corner cluster if the sentence is short, or a side border if you want to write more.
- Limit the pieces. Begin with two background scraps, the writing card and one botanical motif. Keep another scrap nearby without committing to it.
- Arrange and check. Move the pieces until the words and the motif both have space. Close the notebook gently to check the thickness.
- Glue the lower layers first. Use a thin, even application suitable for your paper. Press the edges down and let the adhesive dry.
- Add the final detail. A date, a short label or one small faux stamp may be enough. Stop while the page still feels easy to read.
You can repeat this process with the rain-cloud label, seed-packet memory or paper garden. The useful part is the sequence: decide what the page is about, choose a structure, then decorate around it.
Download the free botanical junk journal ideas guide
The guide has three pages: six creative prompts; three simplified layout diagrams; and six optional writing cards in soft botanical colors. It does not include the watercolor ephemera or faux-stamp artwork from the hero image.
Download A4 PDF
Download US Letter PDF
Choose your paper size and print at 100% / Actual Size. Page three includes a 5 cm check line. The layouts on page two are reference diagrams, not measured cutting templates. Print only the pages you want; plain paper is suitable for the guide and writing cards.
No email signup is needed. Personal use only: make pages for yourself or personal gifts, and share this article link instead of uploading or selling the files. The PDF layout and page sizes have been checked digitally; a physical print-and-make test has not been completed.
For an observation-led variation on these botanical junk journal ideas, pair a paper leaf with the date, place and a detail you noticed outdoors. The Natural History Museum’s guide to keeping a nature journal offers a useful next step for recording your surroundings.
Questions about botanical junk journal ideas
Can I do this without a printer?
Yes. Copy a layout in pencil, cut writing cards from plain paper and use scraps from your own supplies. The guide is optional. A single hand-drawn leaf and one sentence can make a complete page.
What if my page looks too busy?
Remove one patterned piece and replace it with plain paper. Keep one main motif, choose a smaller color palette and leave a clear space around the writing. More embellishments will not necessarily make the arrangement easier to understand.
Can I use real leaves?
A drawn leaf, a paper shape or a printed copy is the easiest flat option for these projects. Fresh plant material can add moisture and change as it dries. If you want to explore pressed leaves, keep that as a separate preparation step and try a small sample before adding it to a finished journal.
Are the November motifs only for autumn?
No. A cloud, a branch, a mug and a field notebook can work in many seasons. Change the colors and written observations to reflect your own surroundings. The woodland motifs also work on cards, bookmarks and small gift notes.
Start with whichever of these botanical junk journal ideas feels easiest today. One useful layout and a handful of familiar motifs can give you many different pages, without needing a new kit for every session.


Looking for another little project? Explore Journaling, Printables or Paper Crafts.