
Christmas Mini Album: 7 Easy Steps + Free Template
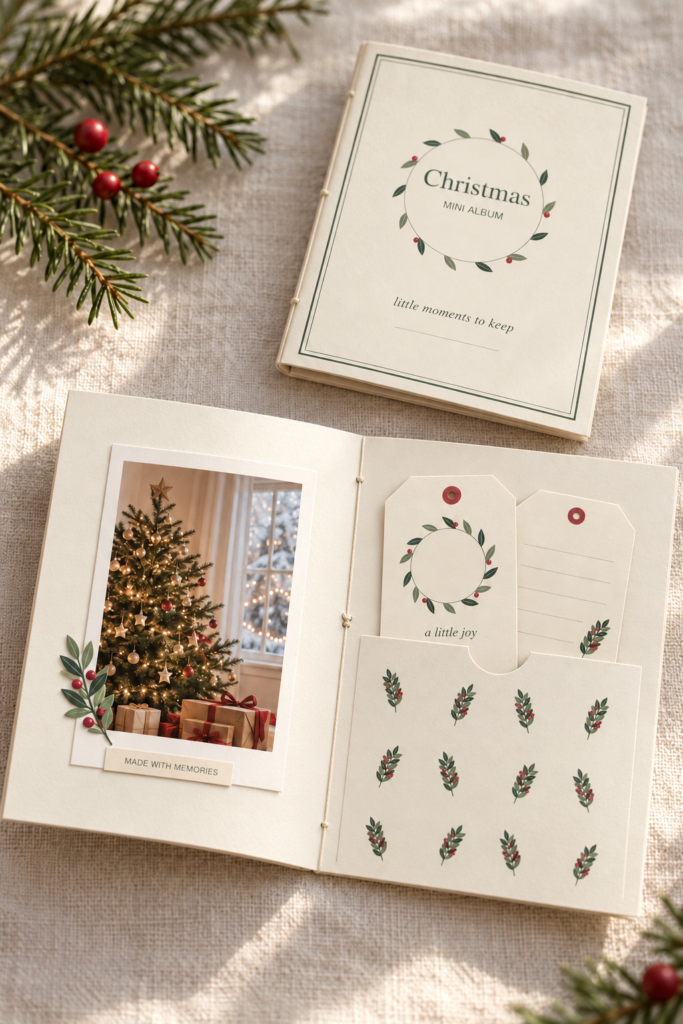
A Christmas mini album gives your favorite December moments a small place to live. A tree photo, a handwritten memory and a tag tucked into a pocket can be enough to tell the story. This beginner project uses two folded page sheets and one cardstock cover, with soft botanical details in cream, forest green and cranberry.
Follow the seven steps below to make a slim Christmas memory book, then download the free five-page mini album template in A4 or US Letter. Both formats make the same finished book. You will add your own photographs and memories; the printable supplies the paper pieces.
Jump to the free Christmas mini album template, or read the printing notes first if this is your first small book.
Table of Contents
What this Christmas mini album includes
The inside pages measure 3.5 x 4.75 inches (about 8.9 x 12.1 cm). The folded cover is a little larger: 3.625 x 5 inches (about 9.2 x 12.7 cm). Two folded sheets give you eight inside page sides, plus the cover. The plain backs count as usable pages, too.
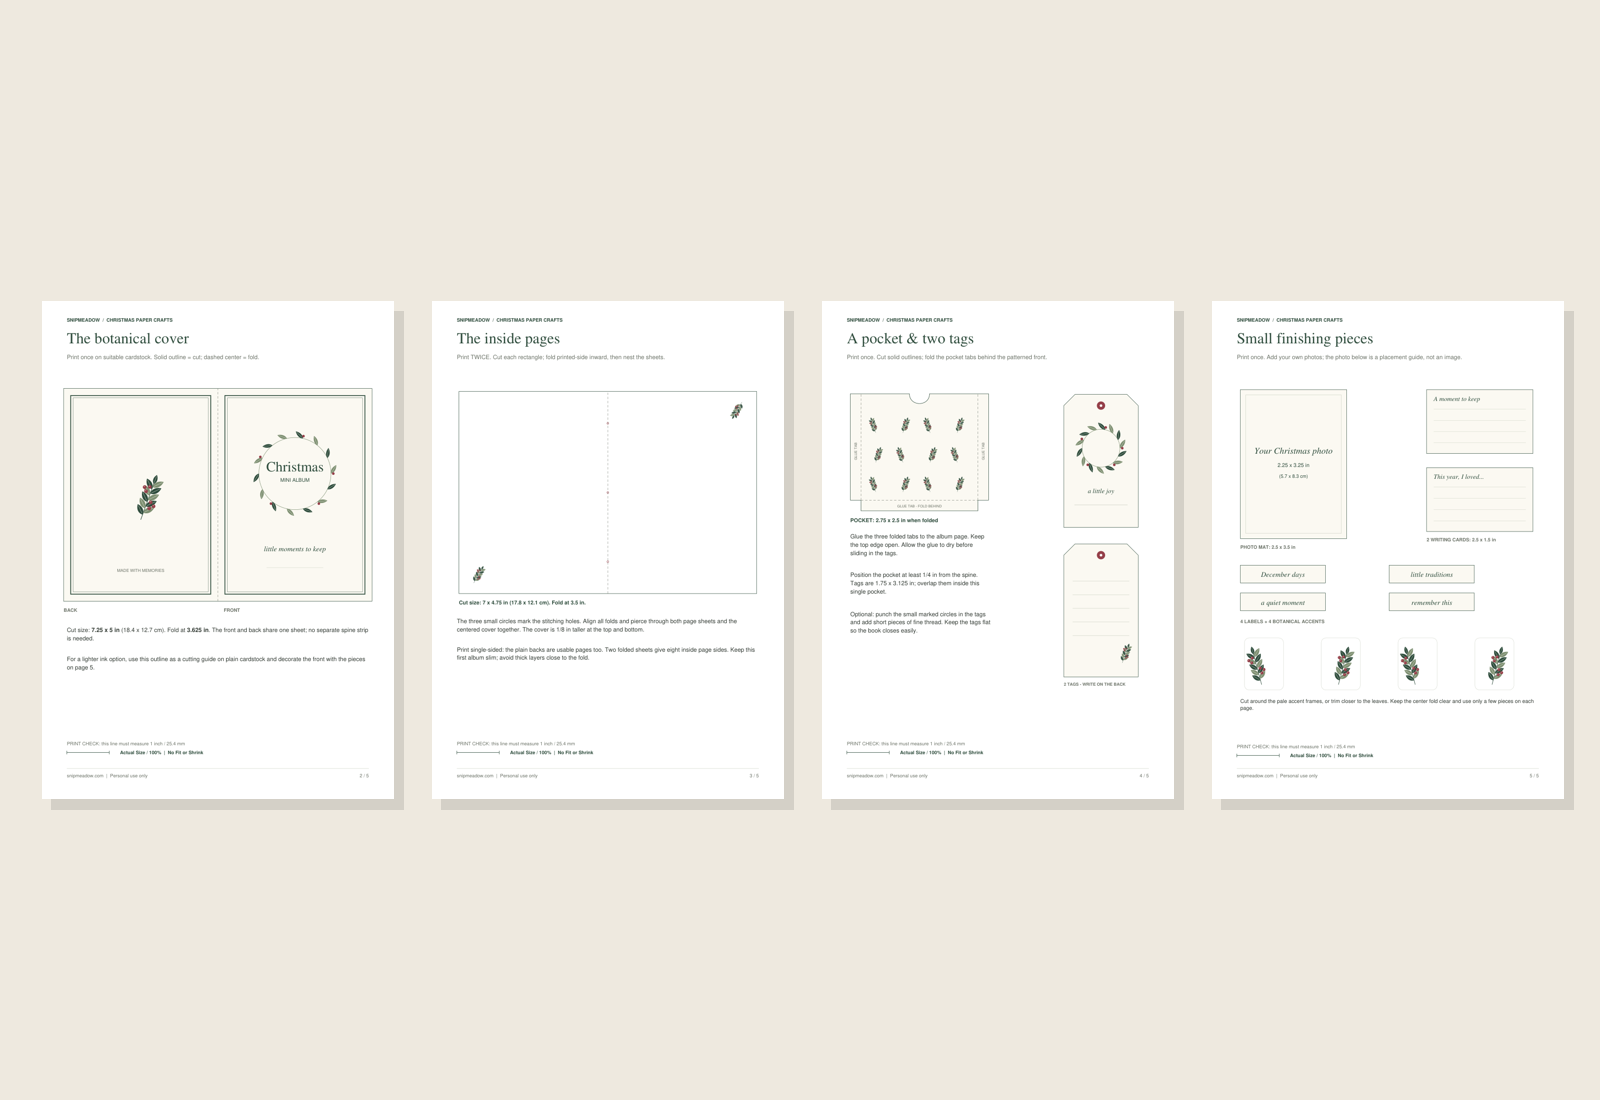
The download contains an assembly guide, a botanical cover, an inside-page pattern, one pocket, two tags, one photo mat, two writing cards, four word labels and four botanical accents. Print the inside-page pattern twice. The accents reuse a matching sprig motif, with alternating directions; they are not four different botanical illustrations.
This is a small project within Christmas paper crafts: part photo album, part seasonal journal. If you enjoy paper craft ideas that use a few supplies and leave room for personal notes, keep the decoration simple and let the memories fill the pages.
Supplies for your Christmas mini album
- The free template in the paper size loaded in your printer.
- Printer-compatible cardstock, around 200-220 gsm for the cover, and paper around 120-160 gsm for the inside pages and pieces. Follow your printer’s paper limits.
- Scissors, a ruler, a pencil and a scoring tool or a smooth, blunt folding tool.
- A small awl or suitable piercing needle, a protective mat or a folded waste-paper cradle, and two paper clips.
- A sewing needle and approximately 18 inches of strong thread.
- A paper glue stick or a small amount of paper craft glue for the pocket tabs.
- A few photo copies, a pen and optional fine thread for the tags.
Use photo-safe adhesive if you want to keep the album for years, and save irreplaceable photographs separately. Copies make it easier to trim an image without worrying about the original. Thin paper scraps work better here than thick chipboard pieces, dried plants or bulky charms.
You do not need a large craft collection. For more ideas about starting with basic papers and tools, see our beginner junk journal guide. A cream cover and a few green accents are enough for a calm, botanical finish.
Print the template at the right size
Open the A4 file for A4 paper or the US Letter file for Letter paper. Choose Actual Size or 100%. Turn off Fit, Shrink and booklet printing. Print single-sided; the reverse of each inside sheet stays blank for writing or another photograph.
- Print PDF page 2 once for the cover.
- Print PDF page 3 twice for the two inside sheets.
- Print PDF pages 4 and 5 once for the pocket, tags and finishing pieces.
- Keep page 1 on screen, or print it as an assembly reference.
Measure the printed check line: it should be exactly 1 inch (25.4 mm). If it is shorter or longer, fix the scaling before cutting. A4 and Letter change the surrounding sheet size, not the dimensions of the album pieces.
The templates have been checked digitally for size and layout. Make a quick plain-paper version before using your favorite cardstock, especially if your printer scales pages automatically. The styled image shows a possible finish; it is not a photograph of a physically tested sample.
Christmas mini album tutorial: 7 easy steps
1. Cut the cover and page sheets
Cut the cover along its solid outer outline. It measures 7.25 x 5 inches before folding. Cut two inside rectangles, each 7 x 4.75 inches. Leave the dashed fold lines uncut. Set the pocket and small decorations aside until the book is bound.
Keep the pieces square by following the straight edges with a ruler. If you are tracing the pattern onto another paper, transfer the fold position as well as the outline. Avoid trimming the cover down to match the pages: the small overhang helps protect their edges.
2. Fold and nest the sheets
Score the cover gently at its center, 3.625 inches from either short edge, then fold with the cover artwork facing outward. Fold each inside sheet at 3.5 inches, with its printed side facing inward. Crease the sheets separately so the folds remain neat.
Nest one folded page sheet inside the other. Place both inside the folded cover, align all three folds and center the pages vertically. The cover extends about 1/8 inch above and below the pages. Clip the stack so nothing moves while you make the holes.
3. Pierce three stitching holes
Open the nested book at the center. Use the three small circles along the innermost fold: the top and bottom holes are 3/4 inch from the page ends, and the middle hole is halfway between them. Call them A at the top, B in the middle and C at the bottom.
Pierce through the entire aligned stack, including the cover, into a protective surface. Keep the holes small and the point away from your fingers. Do not use a regular office hole punch here; its large holes can leave a fragile paper spine.
4. Sew a simple pamphlet stitch
Thread the needle. Starting inside, pass out through B and leave a 3-inch tail. Come in through A, go out through C, then return in through B. Keep the thread snug without pulling hard enough to cut the paper.
Place the two ends on opposite sides of the long inside stitch. Tie a square knot around that stitch, then trim the ends. The University of Utah book arts guide includes a diagram of this traditional three-hole binding. Open and close the book before adding anything else.
5. Make the pocket and add the tags
Cut the pocket, including its three tabs and the small thumb notch. Fold the side and bottom tabs behind the patterned front. The finished pocket body is 2.75 x 2.5 inches. Apply a thin layer of glue to the tabs only, then attach the pocket to one page. Leave the top open.
Keep the pocket at least 1/4 inch from the spine, with space above for the tags. Let the glue dry fully. Cut the two 1.75 x 3.125-inch tags and slide them in, overlapping rather than placing them side by side. Add short tag ties only if the album still closes comfortably.
6. Add photos and short notes
The included photo mat measures 2.5 x 3.5 inches and takes a photo up to 2.25 x 3.25 inches. Trim a copy of your image, cover the printed placement guide and mount the mat on a page. The download does not include photographs.
Use the writing cards on separate pages or write directly on the blank paper. A place, a date and one sentence are enough. Give each page one main subject: a photo, a note or the pocket. You can leave some pages empty and finish the Christmas mini album during December.
7. Decorate lightly and check the fit
Cut a few labels or botanical accents from the last printable sheet. Try the arrangement before gluing: one sprig beside a photograph or one label above a note is usually plenty for a small page. Leave the fold and the pocket opening clear.
Close the book gently after each addition. If it begins to fan open, remove a thick layer or move an accent away from the spine. Let the adhesive dry before stacking or storing the album. An optional loose ribbon around the closed book can keep the pages together, but it should not force an overfilled album shut.
Three ways to fill your Christmas memory book
A tree-trimming evening
Begin with a photo of the tree or one favorite ornament. On the facing page, write who helped, what music was playing and one small detail you might otherwise forget. Keep a short note in the pocket about the story behind a decoration. A narrow scrap of wrapping paper can become a border.
A quiet December day
Choose an ordinary moment: a warm drink, a winter walk, a book or light through the window. Use the “a quiet moment” label and write two or three sentences. This DIY mini scrapbook does not need a big celebration on every page. Small routines often make the most personal memories.
A little gift of shared memories
Fill two or three pages with moments you shared with someone, then leave the remaining pages for them. Write a message on the back of one tag and a date on the other. Keep the album unnumbered so the recipient can add their own photographs in any order.
If the blank cards leave you searching for words, choose one of our Christmas journal prompts. For an extra decoration you can draw yourself, try the easy Christmas doodles on a separate scrap first.
Download the free Christmas mini album template
Choose the format that matches your printer paper. Each PDF has five pages and contains the same designs and finished piece sizes. Remember to print the inside-page sheet twice. This free mini album template is for personal use; please link to this article when sharing the project.
Download the Christmas Mini Album Template – A4
Download the Christmas Mini Album Template – US Letter
Save the PDF before printing, check the 1-inch line and keep the guide nearby while you assemble the book. For your next craft session, explore our paper Christmas ornament templates for another small project using cardstock and simple folds.
Questions and simple fixes
Can I make a Christmas mini album without a printer?
Yes. Measure one 7.25 x 5-inch cover and two 7 x 4.75-inch inside sheets. Fold them as described above, then add your own pocket or write directly on the pages. The printable adds coordinated decoration and cutting guides, but plain paper makes a usable little book too.
Why does my cover sit slightly beyond the pages?
That is intentional. The cover is 1/4 inch taller than the page sheets and 1/8 inch wider on each folded side. Center the pages rather than aligning them to the top edge. A tiny amount of page-edge variation can remain when folded sheets nest inside one another.
Why will the tags not slide into the pocket?
Check that the glue is only on the folded tabs and has not spread across the inside. Let it dry before trying again. Use thin paper for the tags and overlap them. If you resized one printable page, reprint the pocket and tags at the same 100% scale.
Can I add more pages or full-size photographs?
The supplied project is designed around two folded inside sheets and small photo copies. Full-size 4 x 6-inch prints do not fit. Keep this version slim; extra sheets and heavy layers change how it folds and closes. For more photographs, make a second matching booklet instead of filling the spine too tightly.
Can I use the designs for other craft ideas?
For personal projects, you can use the labels on a Christmas journal page, tuck a tag into a card or add a sprig to a gift note. Match the piece to the space available and keep the printable at its original size when a fitted pocket is involved. A few coordinated details can carry the same botanical mood into several paper craft ideas.
Start with one photo and one sentence. The rest of your Christmas mini album can grow a little at a time as the season unfolds. For more seasonal printables and gentle journaling ideas, join Creative Notes through the signup form on SnipMeadow.


Looking for another little project? Explore Journaling, Printables or Paper Crafts.